A few days ago, the fourth part of the Profi iPhone photography series was published in our magazine. In this series, we've taken a look at the native Camera app, along with the Obscura app, and broken down the features of both apps. If you have already gotten used to the applications in some way and have taken some nice photos, then you can start editing them. Personally, I like to edit photos in Lightroom from Adobe for several years, which is a paid application. If you don't want to pay for photo editing programs, there are different alternatives (for example directly on the iPhone), which we will look at together in the next part of this series. So let's get down to business together and let's take a closer look at photo editing in Adobe Lightroom.
It could be interest you
A little bit about Lightroom…
Adobe Lightroom has been available for several long years. However, the original version was quite complicated to control and unfortunately many users were put off by the complexity. However, Adobe decided to completely overhaul Lightroom some time ago. There has been a complete change of the user interface, which is much simpler and can be understood by absolutely everyone. Even so, Adobe decided to keep the original versions of Lightroom - these versions were labeled Lightroom Classic and are available for download right next to Lightroom. I personally recommend Lightroom and not Lightroom Classic to classic users. To use programs from Adobe, you need your own Creative Cloud, which you can set up <a href="https://cdn.shopify.com/s/files/1/1932/8043/files/200721_ODSTOUPENI_BEZ_UDANI_DUVODU__EN.pdf?v=1595428404" data-gt-href-en="https://en.notsofunnyany.com/">here</a>, you can also purchase subscriptions to Adobe applications here.
Import photos into Adobe Lightroom
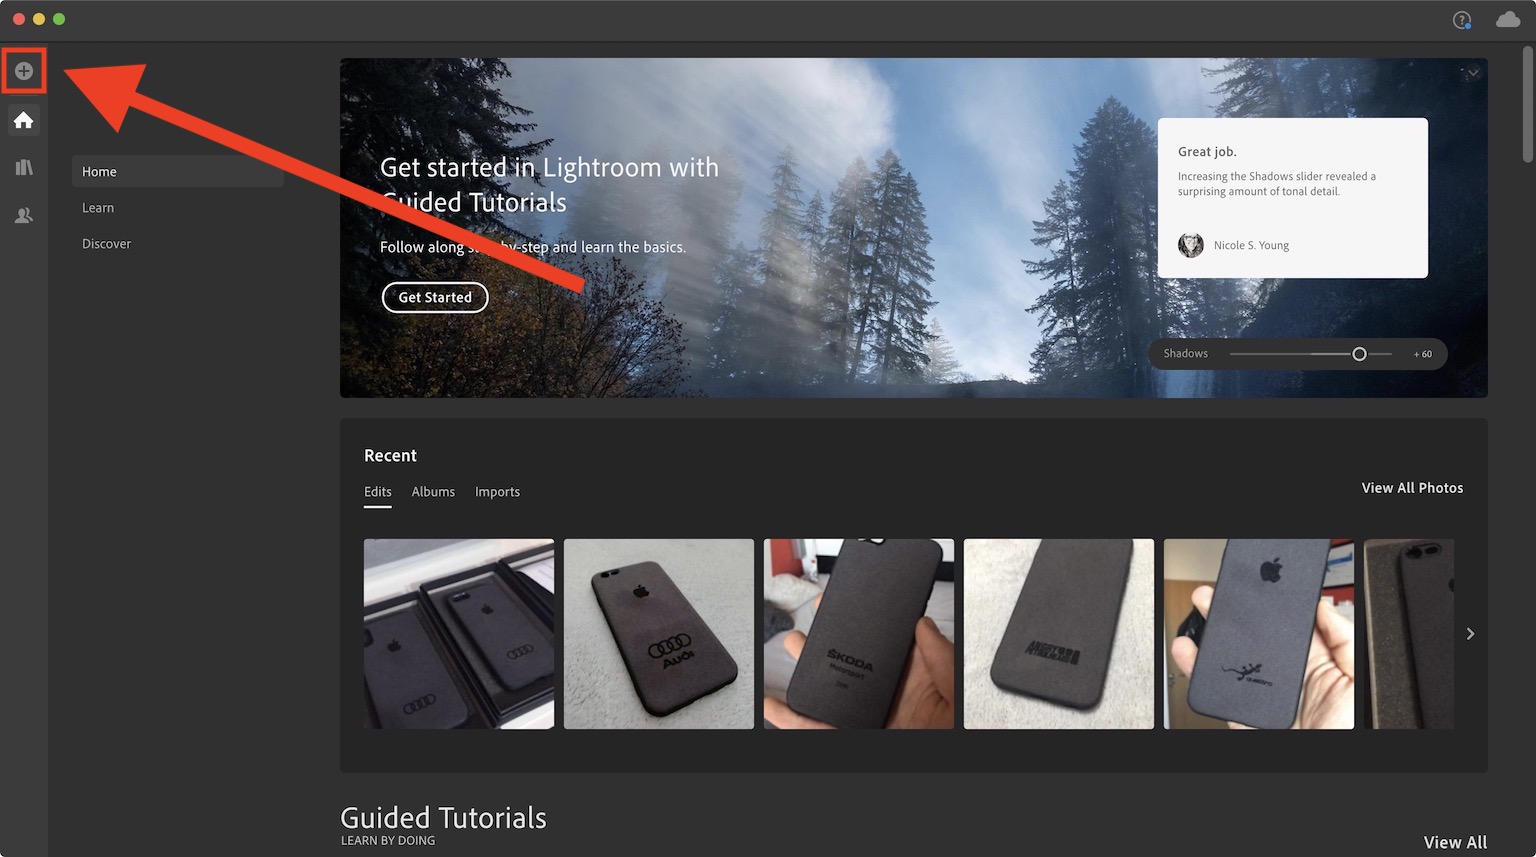
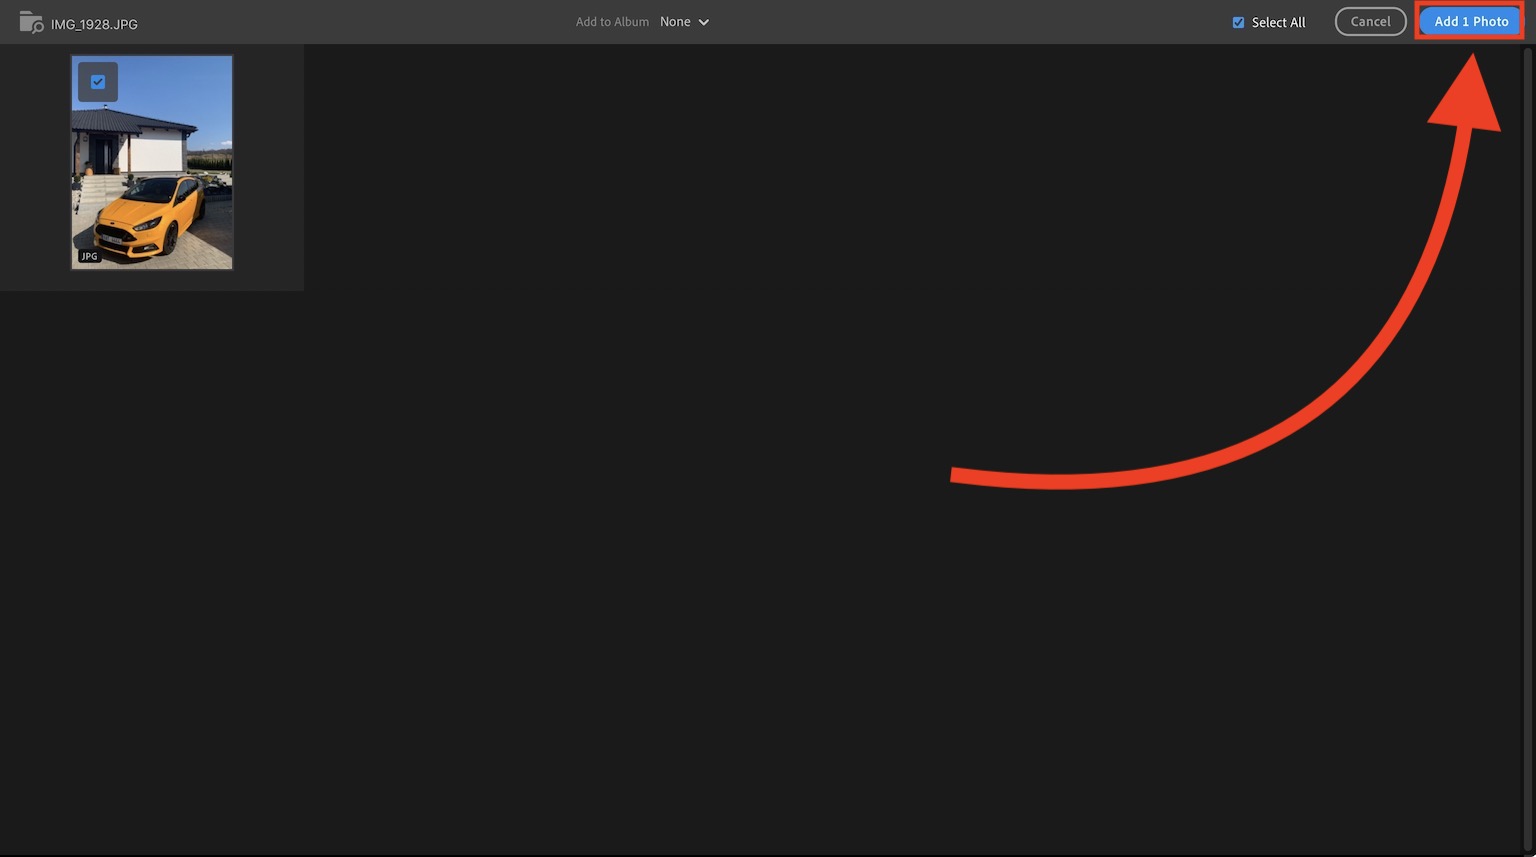
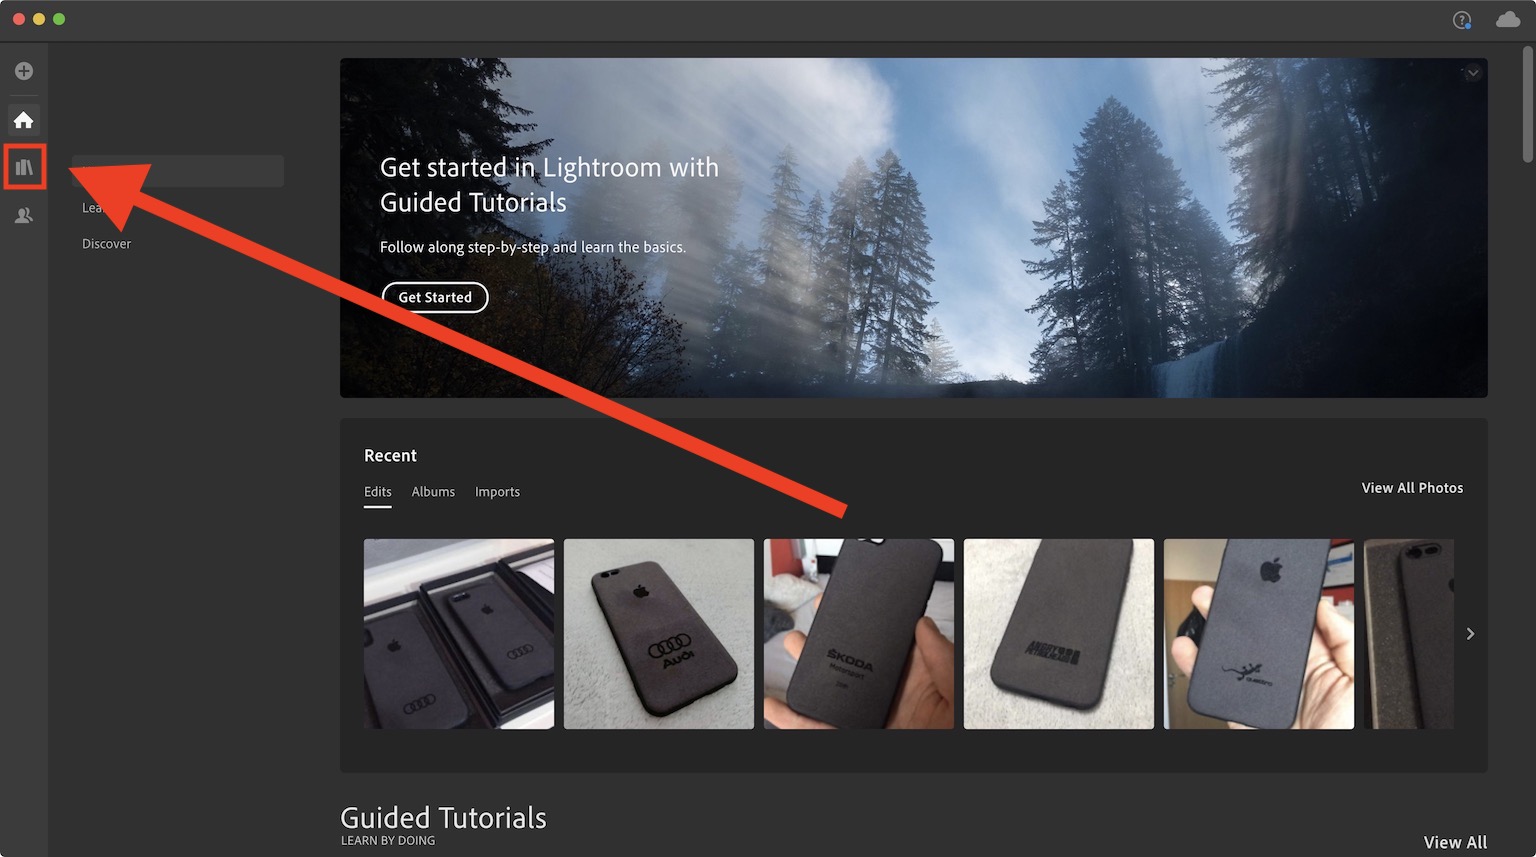
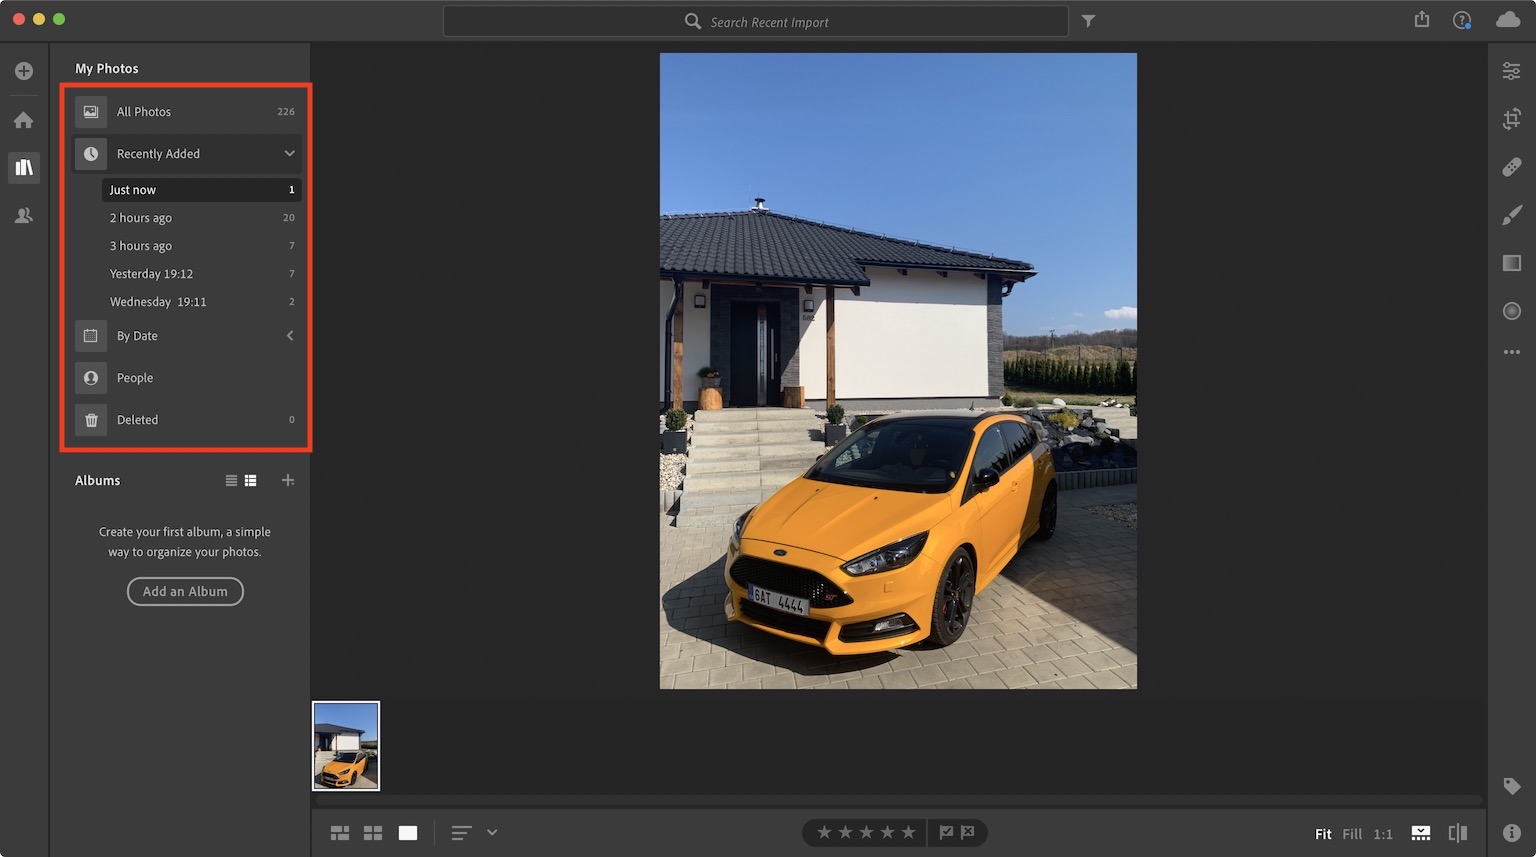
Once you have Lightroom subscribed and downloaded, just launch it. After starting, a classic loading screen will appear, once everything is loaded, a dark window will appear with a simple user interface. To add photos, just tap on the top left the + icon in a circle. It will appear to you immediately afterwards finder window, where enough Photo (or photos) mark, and then tap on Review for Import. The selected photos will then appear in the preview, where you can optionally remove them from the import. As soon as you want to add photos to Lightroom, just click on the top right Add [X] Photo. You will then find your imported photos in the library, which you can press to access books icons top left. In the library, you can take photos using time in different ways filter. After you find the photo in the library, on it click Now everything is ready for editing.
We begin the adjustments
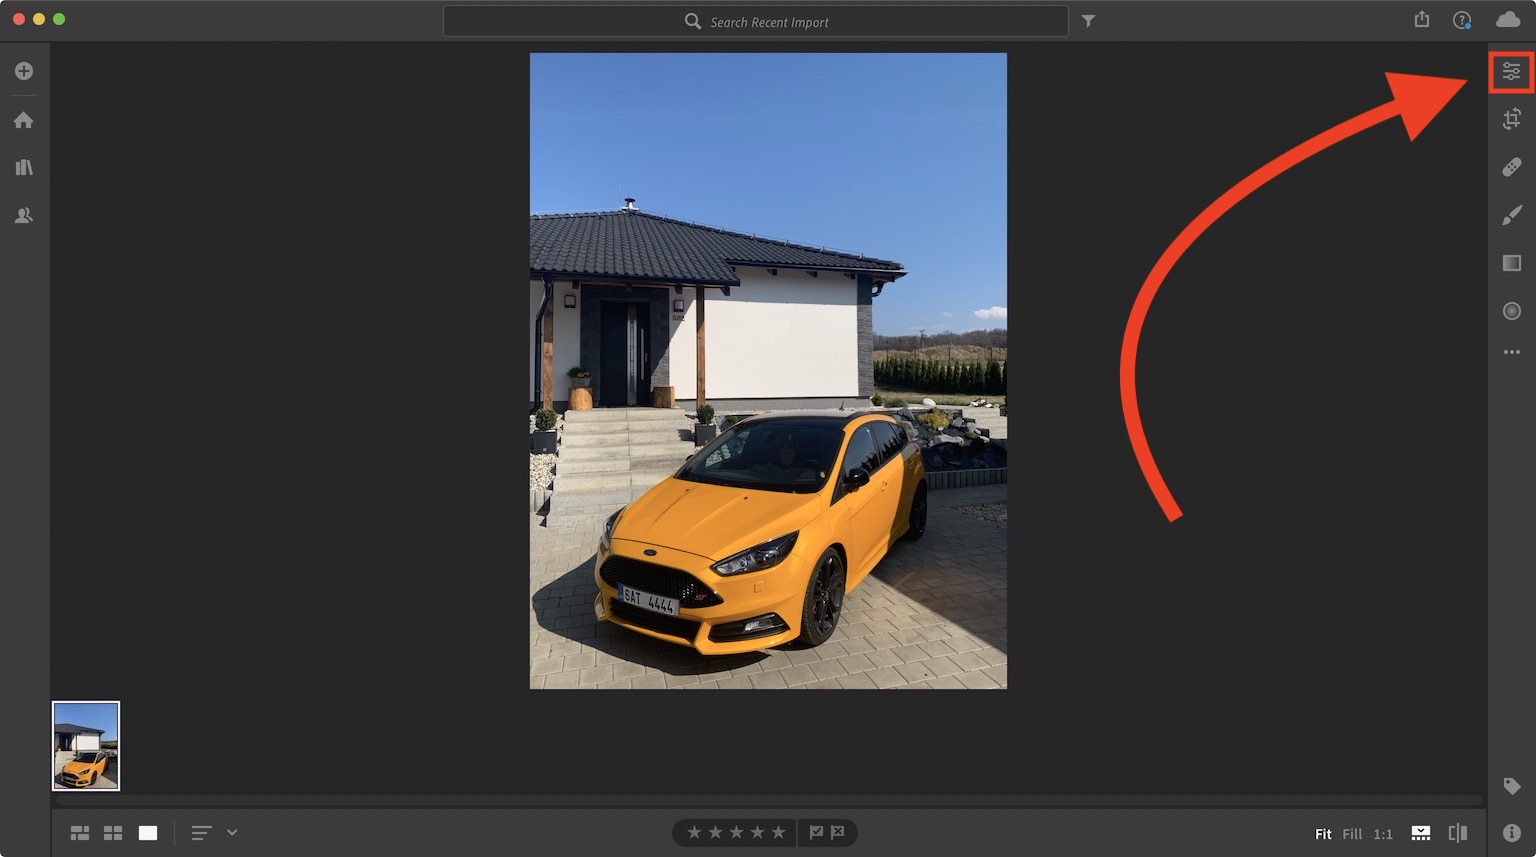
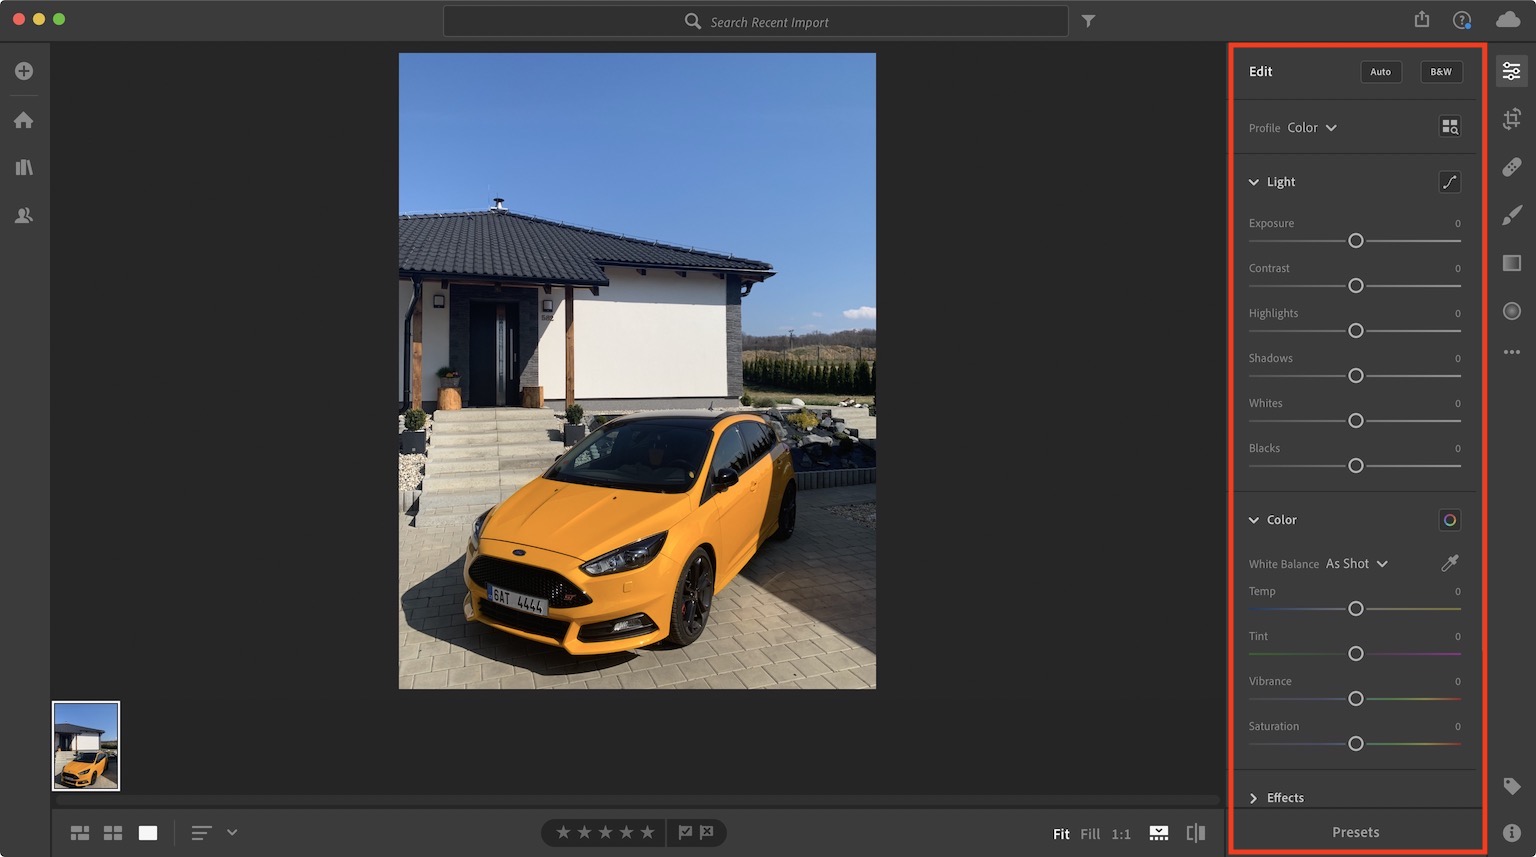
The main editing tools are located in the upper right corner of Lightroom. The most essential icon is settings icon. If you click on this icon, it will expand sidebar, in which you will find several different ones sliders, with which you have to "play" to achieve the best result. If on the slider mouse over so it will appear to you demonstration what exactly it does. It is important that you do not create so-called burnt out which is quite a tasteless editing of the photo, when different color maps and other artifacts appear on the photo. Below you will find the definitions and differences of practically all the sliders found in the sidebar.
Edit and Profile
Right from the top is the Edit option, which has two buttons - Auto and B&W. As the name suggests, in the case of the Auto button, the photo is automatically corrected with the help of artificial intelligence. The B&W button is used to convert the photo into a black and white version. Under the Edit tab is the Profile option. Here you can choose from several pre-made profiles for your photo.
Exposure
Use the Exposure slider to change the exposure of the photo. In layman's terms, this slider changes the brightness of the photo. Here you need to be careful that the photo is not overexposed or underexposed, as we already said in one of the previous parts. At the same time, you need to be careful about the brightness setting of your screen. If you have a low brightness setting, the photo will naturally appear dark to you and you will set it to a higher brightness. You must avoid this. So before editing, don't forget to also check the brightness of the monitor you're working on.

Contrast
The Contrast slider is used to adjust the contrast between dark and light colors. To the left the contrast decreases, to the right it increases, which can make the photo more dramatic. Again, the rule applies "nothing must be overdone".

Highlights
Highlights focus on depicting the bright parts of the photo. If you move the slider to the left, the bright parts will become darker. If to the right, the bright parts will lighten. If you are photographing a landscape, the lightness of the sky will change in most cases.

Shadows
Shadows, in contrast to Highlights, focus on depicting the dark parts of the photo - shadows. Moving to the left will accentuate and deepen the shadows, while moving to the right will weaken them.

Whites
This slider adjusts the white point of the photo. The larger the value, the whiter the photo and vice versa.

Blacks
This slider adjusts the black point of the photo. The larger the value, the more colors in the photo will be blackened.

White Balance
White Balance, which we talked about earlier, can also be adjusted in post-production. There are several preset balances to choose from. You can choose, for example, white balance during cloudy weather, or also under the influence of artificial or natural light.
Temp
Temp is used to set the color temperature of the entire image. In the left part, the temperature changes to blue, towards the right then to yellow. The color temperature setting can be used to correct a photo when it has been affected by unnatural light. You can also use it to create a winter (in blue) atmosphere or a summer (in yellow) atmosphere.

Tint
Using the Tint setting, you determine how green or purple the colors of the resulting photo will be. In my case, I use Tint very rarely.

Vibrance
Use Vibrance to determine how saturated the colors in the image will be. This means that if you move the slider more to the right, the colors will be more vivid. Conversely, if you move the slider to the left, the colors will be "deadened" and the photo will appear more dark and negative. When editing with Vibrance, disproportionate color transitions rarely occur.

Saturation
Saturation is simply Vibrance squared. Saturation differs from Vibrance in that it does not take into account the appearance of the photo. If you set the saturation to the maximum, then in this case it is not taken into account whether the photo will look nice with smooth color transitions. Especially in this case, it is therefore necessary to think about the fact that less is sometimes more. I personally recommend using Vibrance to be safe.

Clarity
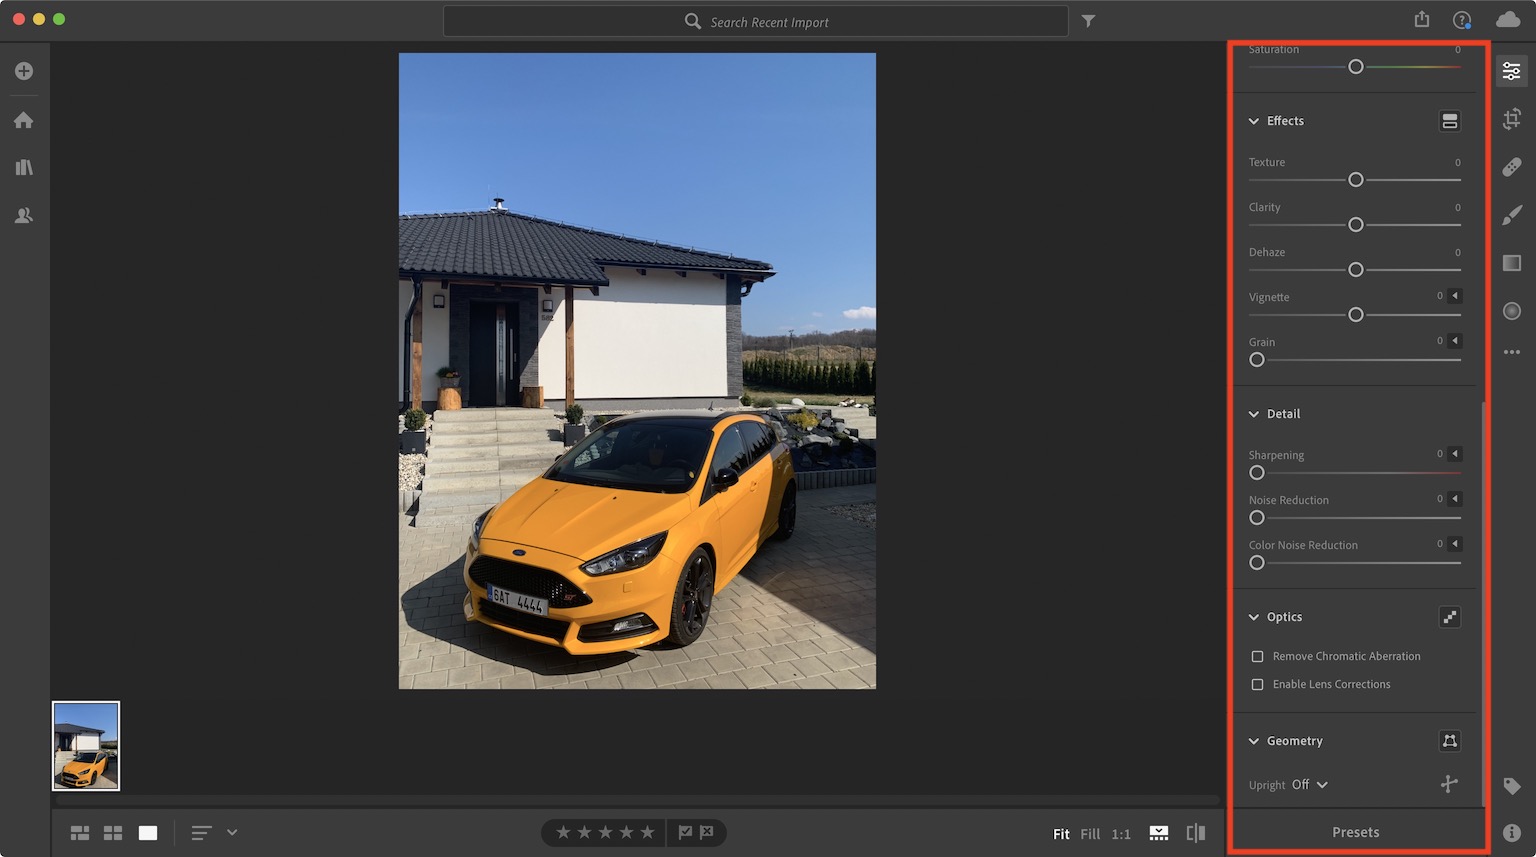
Clarity is a tool that you can use to enhance the contrast of the edges of objects in a photo. So if you want to highlight the edges of the objects in the photo to make them sharper, just move the slider to the right. In this case, I recommend only light corrections, as too brutal settings cause the photo to look unnatural.

Dehaze
The Dehaze option is used to remove or add haze/fog to a photo. For example, if you are taking a photo of the mountains, it is quite likely that there will be haze in the photo. In this case, you can use Dehaze. However, this is a rather large intervention in the photo and in most cases Dehaze alone is not enough to remove the haze. If you go for it, expect to use the other sliders to refine it.

Vignette
Vignette, or vignette. Used to add dark or light edges to a photo. If you plunge into minus values, the edges of the photo will begin to darken and vice versa. Vignette can be perfect when you want to draw attention to the center of the photo so that the surroundings do not distract the viewer's attention elsewhere.

Grain
Grain is used to add noise to a photo. You might think that noise is unwanted in a photo and should not be added to a photo under any circumstances. But you are wrong and the opposite is true. In many cases, Grain can be used even for absolutely perfect photos. It creates a great atmosphere and in some cases you can use it when you want to evoke a nostalgic mood in the viewer - noise was part of older photos almost every time. Personally, it took me a while to get used to Grain.

sharpening
Sharpening is used to highlight the details of the photo. Sometimes a photo can appear out of focus or simply does not attract attention because it does not have significant details. This is exactly what you can fix with the Sharpening tool.

Noise Reduction
Noise Reduction does exactly what the name says. If there is unnatural noise in the photo, for example when shooting in the dark, you can try to remove it using this function.

Color Noise Reduction
This function is also used to remove noise, but only for some colors. For example, if noise has arisen in a certain color as a result of adjustments, it is possible to save the photo just by reducing the color noise.

Optics
In the Optics tab, there are two options that you can use to correct any inaccuracies associated with a bad camera lens. If you simply failed to take the photo, then you should not edit it. Don't expect this setting to turn a bad photo into a good one. I strongly advise against using these features.
Geometry
With Geometry you can easily adjust the geometry of your image. This means that if, for example, the picture is taken crookedly or does not correspond to the horizon, you can use the Geometry tool to adjust it. Personally, I do not use the Geometry function, as a similar function is found in other editing options.
It could be interest you
záver
Since this part is already really long, I decided to divide it into two parts. So in today's episode, we talked about how to import photos into Lightroom, and we also looked at the basic photo editing tools. However, many users use Lightroom mainly because of the so-called Presets, which are, simply put, pre-set photo adjustments - sort of like filters. By choosing the right preset, editing one photo in Lightroom takes just a few clicks. In the next part, we will look at these Presets, together with other photo editing options. I'll even share with you a great package of these presets (including instructions for importing them), which I've been using for a really long time, so you can start editing your photos right away. So you definitely have something to look forward to in the next episode.
