It's been a while since we brought you the third installment of the Getting Started with Engraving series. In the previous parts, we showed together where and how to order an engraver and last but not least, you could read about how to build an engraving machine correctly. If you have gone through all of these three parts and decided to buy an engraving machine, you probably already have it correctly assembled and functional at the current stage. In today's episode, we will look together at how the software designed to control the engraver works and at the basics of its use. So let's get straight to the point.
It could be interest you
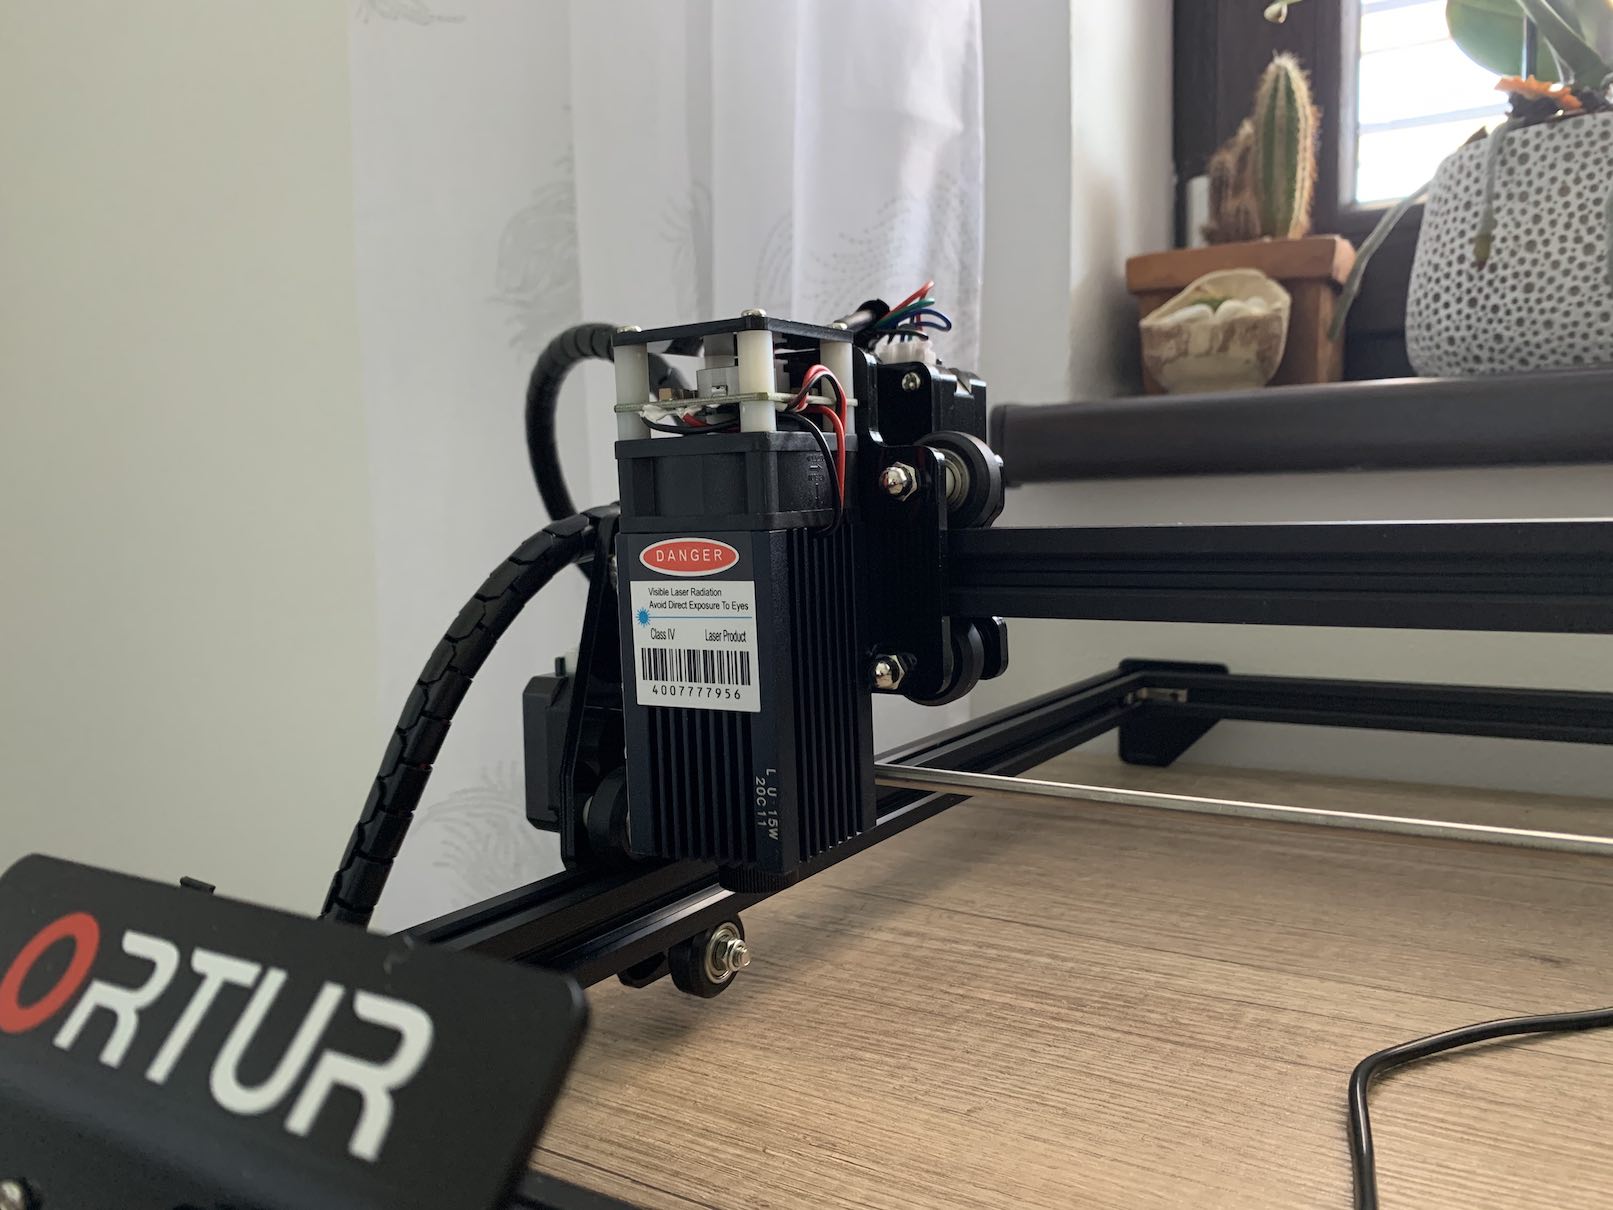
LaserGRBL or LightBurn
Some of you may not be clear about the program through which the engraver can be controlled. There are quite a few of these programs available, however for many similar engravers like the ORTUR Laser Master 2, you will be recommended a free application LaserGRBL. This application is really very simple, intuitive and you can handle practically everything you might need in it. In addition to LaserGRBL, users also praise each other light burn. It is available for free for the first month, after which you have to pay for it. I personally tested both of these applications for a long time and I can say for myself that LaserGRBL was definitely much more convenient for me. Compared to LightBurn, it is really easy to use and the performance of classic tasks is much faster in it.
You can buy ORTUR engravings here
In my opinion, LightBurn is primarily intended for professional users who need complex tools to work with the engraver. I've been trying to figure out LightBurn for a few days, but almost every time I've ended up with a few tens of minutes of trying to shut it down in exasperation, turn on LaserGRBL, and it simply does the job in a matter of seconds. Because of this, in this work we will only focus on the LaserGRBL application, which will suit most users, and you will become friends with it very quickly, especially after reading this article. Installing LaserGRBL is exactly the same as in all other cases. You download the setup file, install it, and then simply launch LaserGRBL using a desktop shortcut. It should be noted that LaserGRBL is only available for Windows.
You can download LaserGRBL for free from the developer's website

First run of LaserGRBL
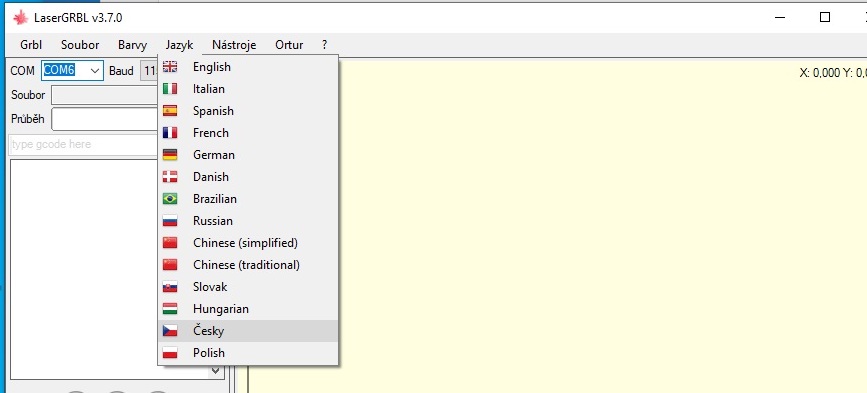
When you first start the LaserGRBL application, a small window will appear. I can state right at the beginning that LaserGRBL is available in Czech - to change the language, click on Language in the upper part of the window and select the Czech option. After changing the language, pay attention to all kinds of buttons, which at first glance are really quite a lot. To make sure that these buttons are not enough, the manufacturer of the engraver (in my case, ORTUR) includes a special file on the disk, which contains additional buttons to help you with the correct operation of the engraver. If you do not import these buttons into the application, it will be really difficult and practically impossible for you to control the engraver. You import the buttons by creating a file from the CD whose name resembles a word buttons. Once you have found this file (often it is a RAR or ZIP file), in LaserGRBL, right-click in the lower right part next to the available buttons on an empty area and select Add custom button from the menu. Then a window will open in which you point the application to the prepared button file, and then confirm the import. Now you can start controlling your engraver.
Controlling the LaserGRBL application
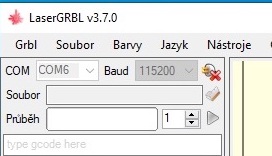
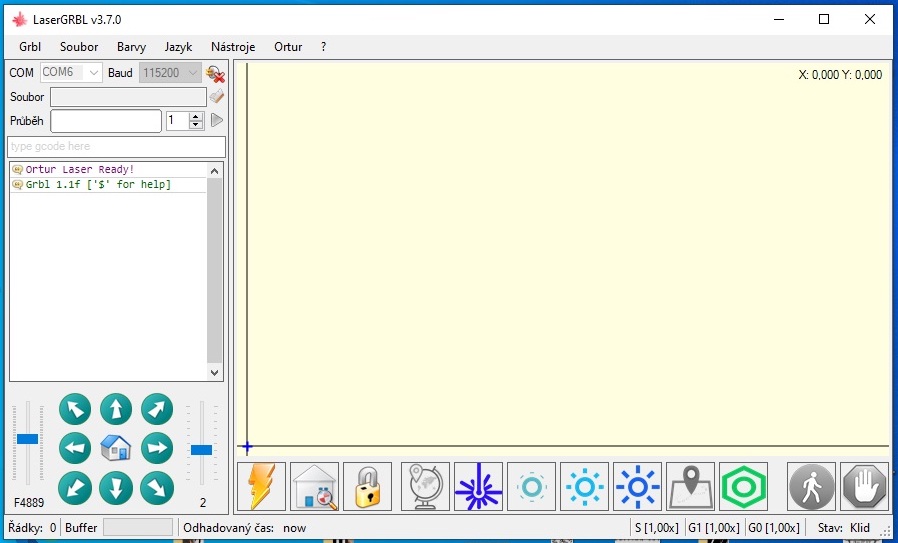
After changing the language and importing the control buttons, you can start controlling the engraver. But even before that, you should know what the individual buttons mean and do. So let's start in the upper left corner, where there are several important buttons. The menu next to the text COM is used to select the port to which the engraver is connected - make the change only if you have several engravers connected. Otherwise, automatic selection occurs, as in the case of Baud next to it. The important button is then located to the right of the Baud menu. This is a plug button with a flash, which is used to connect the engraver to the computer. Assuming that you have the engraver connected to USB and to the mains, it should connect. In some cases, it is necessary to install the drivers after the first connection - you can find them again on the enclosed disc. Below is then the File button to open the image you want to engrave, Progress after starting the engraving of course indicates the progress. The menu with a number is then used to set the number of repetitions, the green play button is used to start the task.
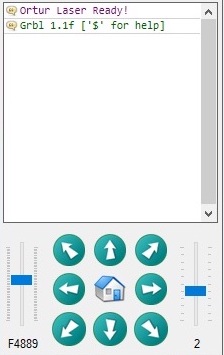
Below is a console where you can monitor all the tasks assigned to the engraver, or various errors and other information related to the engraver may appear here. At the bottom left, there are buttons with which you can move the engraver along the X and Y axis. On the left, you can set the speed of the shift, on the right, then the number of "fields" of the shift. There is a house icon in the middle, thanks to which the laser will move to the starting position.
Controls at the bottom of the window
If you have correctly imported the buttons using the above procedure, then in the lower part of the window there are several buttons that are intended for controlling the laser and setting the behavior of the engraver. Let's break down all these buttons one by one, starting from the left of course. The button with the flash is used to completely reset the session, the house with the magnifying glass is then used to move the laser to the starting point, i.e. to the coordinates 0:0. The lock is then used to unlock or lock the next control to the right - so that, for example, you don't accidentally press the control button when you didn't want to. The tabbed globe button is then used to set new default coordinates, the laser icon then turns the laser beam on or off. The three sun-shaped icons on the right then determine how strong the beam will be, from weakest to strongest. Another button with a map and bookmark icon is used to set the border, the mother icon then displays the engraver settings in the console. The other six buttons on the right are used to quickly move the laser to the location that the buttons represent (that is, to the lower right corner, lower left year, upper right corner, upper left year and to the top, bottom, left or right side). The stick button on the right is then used to pause the program, the hand button for complete termination.

záver
In this fourth part, we looked together at the basic overview of controlling the LaserGRBL application. In the next part, we will finally look at how to import the image you want to engrave into LaserGRBL. In addition, we will show the editor of this image, with which you can set the appearance of the engraved surface, we will also describe some important parameters related to the engraving settings. If you have any questions, don't be afraid to ask in the comments, or send me an e-mail. If I know, I will be happy to answer your questions.
You can buy ORTUR engravings here



Greetings. It reads well, especially for me, who owns a similar engraver. I mainly want to cut paper up to 1 mm thick with it. I believe that you will also focus on how to achieve that the resulting size corresponds to the original. E.g. I set the width of the image to 30 mm (that is, if the size in the program under the number 30 means mm), however, the result was only 25 mm. He couldn't make a circle at all and the writing was worthless. Will I learn about these things here? Thank you
Hello, in my case the resulting size corresponds to the set size - so if I set the width to 30 mm before engraving, the resulting object has a real width of 30 mm. And if you are not able to accurately burn a circle through the engraver, then you probably have it assembled incorrectly - take a look at the third part of this series: https://jablickar.cz/zaciname-s-gravirovanim-sestrojujeme-a-zapiname-gravirovacku-3-dil/
I have to thank the author of these pages, because by publishing this guide, he swayed me to buy an engraver. Engraver bought in China, delivered in 4 days (four days in words). I shop at Chinese shops quite regularly, and so far no problem. With the several dozen items I ordered, they were not delivered in only two cases. After the complaint, they returned the money immediately. I can only recommend. And when it comes to this engraving, I would definitely welcome more advice and instructions.
Hello,
I would like to ask about the power of the laser. Can the strength be set to 3 intensities only in that program?
Or if the laser has, for example, a maximum power of 5W, then I can adjust the power to my liking. I like that when I watched the video of the engraver
https://www.banggood.com/NEJE-MASTER-2-Upgraded-3500mW-DIY-Laser-Engraving-Machine-CNC-Wood-Router-Laser-Engraver-Cutter-Printer-Print-Logo-Picture-Laser-Engraving-Machine-p-1448860.html?utm_source=google&utm_medium=cpc_ods&utm_content=ruby&utm_campaign=ruby-sds-wah-czw&ad_id=459234431239&gclid=Cj0KCQjwzbv7BRDIARIsAM-A6-3zrAusOVS2f42w3In83C995SCs1Js5xh6DO5cA2dxSHtgOjKILJ2YaAplsEALw_wcB&cur_warehouse=CN, so when engraving plywood, they changed the laser during engraving and cutting.
Thank you for answer
You can adjust the strength as you like. Specifically, how fast the laser moves is set. The higher the speed, the lower the force.
The laser must support power control, otherwise click in the LaserGRBL window near the right, at the very bottom - where power control, speed and acceleration (S,G1,G0) are.
Hello, please, I bought a laser from China, it engraves a mirror and I don't know what it could be. I have the engraving master program. And I also want to ask, is there somewhere cutting plywood or is it cut at the speed of a laser? I can't find the depth of cut. Thanks for the reply Jarda
From my own experience - I would try swapping the cables to the motors. I connected the axis motors wrong like that and I also engraved in a mirror. Of course, after swapping the cables, don't forget to readjust the zero (it also depends on the type of laser).
I also have a problem with the opposite direction of movements. Those cables have crimped ends, so they can't be changed unless I cut them. I first tried it in the Benbox program and it went in the right direction there. Len is unstable so I wanted to try GRBL and suddenly it goes the other way. What is it in?
Hello, I reinstalled the drivers and it sleeps fine. I originally mirrored the image in the settings before burning. And as for cutting, I have the weakest laser, 2,5W, and I won't put it past 3mm.. I tried maximum power, minimum movement and after an hour I didn't even cut a 5x5 cm square.. I'm going to 40W as soon as I can. .otherwise the depth is determined by the speed, or the power of the fire..
Hello,
Great articles to get you started. If you have time, I need some advice. Mi Ortur Master 2 20w version arrived. Connection, installation, everything without problems. The problem occurred when moving the laser along the y-axis. The laser moves to the end positions without any problems, but when burning or mapping, instead of moving in one direction, the arm moves along the y-axis one step back and forth and practically burns one line. When I move this axis using the arrows in LaserGRBL, I click the down arrow and the laser moves randomly up or down. It's like he's getting confused. I couldn't find a solution anywhere. The same error occurs in LightBurn on MAC. I refinished the toothed belt, tried replacing the USB cable, checked the connectors, no play anywhere. I'm at the end.
Hello, I'm a newbie, I bought an engraving machine, the instructions on how to add buttons don't work, I don't know what to do with it. Someone bought Rybitví, Pardubic, who could help me with this? Thank you
Hello, when do you plan to release the next part?
Thank you.
Based on this great series I also bought the Ortur Master 2 15W and I am very satisfied. It actually arrived in 5 days! And that in the time before Christmas! I just have one question - where do I download the buttons?
I had all the necessary files and drivers on the CD that was included. Otherwise you can download the contents of the CD using this link, these are the official files of the manufacturer: https://www.dropbox.com/s/1o76v7d1rkqcb2j/LaserMaster2.zip?dl=1
Unfortunately, this link does not work, although the burner works for me, but I would like to add those buttons. Let me have the set.
Anyone experience with Atomstack A5?
good day,
I have an Atomstack A5 Pro at home and I am very satisfied. I also bought a rotary attachment for it and the machine makes me happy. I bought LightBurn as SW, I work on a Mac (LaserGRBL is for PC, installation on a Mac would be more complicated, but it would also be possible) and there was no problem with both HW and SW - installation, connection, communication between SW and HW,... I'm still playing around a bit with the fact that different materials are cut/engraved differently, but I've already tested a lot of settings and they work. I've burned into plywood - poplar, beech - the results are amazing. i tried leather too and good too. it cuts paper very nicely. from my point of view, I can only recommend it and I think it will bring a lot of joy not only to you, but if you dedicate the results of your playing to someone, you will see the joy
Hello.
I have a problem connecting the engraver via USB cable. It does not want to connect with the software. I have installed Driver_CH340SER. I have downloaded LaserGRBL version 4.3.0
Thanks in advance for the advice.
Solved :-)
the last solution idea came out:
– turning off the engraver with the button and turning it on again
– resetting with the RESET button on the control board
Then the software immediately found the connection port (it was not COM1, which could not be changed until then) and connected.
Hello, have you ever come across the problem that the svg export from Illustrator gets confused by GRBL and changes the scale? Everything is magnified several times for me. Thanks for the advice Martin
Hello, I would like to ask if anyone has encountered the same problem as me... The engraver works, everything is OK including the laser, I'm just worried about scrolling along the axes. You can only move from the lower left corner to the upper right corner, i.e. opposite each other, otherwise the engraver will not move, or it will either move somewhere else than it should, or it will "jerk". Can anyone advise me? Thank you so much.
I had a similar problem until I noticed that one wire to the motor was pulled out with a terminal. Then ok.
Does anyone have any advice on how to edit the text (GRBL, LightBurn) so that the letters do not fall out after cutting into the cardboard? (O, A, B, …) i.e. to be able to “insert” small connectors.
good day,
I did not discover this option in LightBurn. I personally edit things outside and after editing I import it and continue with the edited object. But there is certainly a font that is already ready for this option (eg: https://www.ceskefonty.cz/ceske-fonty/vida-stencil-demo – below the link is just a sample of the font)
Hello, has anyone solved the problem with the inaccuracy of the X axis? Somehow it skips by a few mm during engraving and the result is to be thrown away. Belts and cables are fine.
This exact problem bothers me too. Does anyone have a solution?
I had the same problem. It was enough to set the run-up and run-down values in the GRBL settings and everything runs as it should. I'll try to find those numbers somewhere...
Hello, does anyone have a custombuttons.gz download that you could provide me with. The Ortur Laser Master Pro S2 engraver arrived without a CD and the link on the manufacturer's website does not work. Thank you
Anyone with experience with a MAC and a program other than GRBL and LightBurn?
Hello,
it engraves me like a mirror, how can I change it please?
Hello, don't know how to set up the laser? The more I did, the rougher the laser line. Can you advise? Thanks
the problem will be a dirty laser lens, which can no longer focus (like dirty glasses), the smoke from burning settles on the lens and over time the laser light is scattered on the dirt and thus the laser track on the workpiece is wider and the beam power is weaker. It helps a) changing the lens of the laser where possible and at the same time auxiliary blowing with air, which removes the fumes from the laser so that they do not settle. b) it is solved by the laser unit itself with the help of a cooling fan (some newer and stronger lasers) or a blower must be added externally (air pumps are used for ponds, etc.)
Hello, I am a complete beginner and I would like to ask if it is possible to download the necessary files for burning somewhere. Are there any free templates somewhere? Thank you
Hello, I have a question about DPI, is there a table for that regarding how many lines are there per mm, I saw it somewhere but I'm not sure. Thank you
Hello, I bought an Atomstack A10 Pro and I need some advice as I am a complete beginner. I don't know how to set cutting and engraving in one task in one image. I somehow manage separate cutting or engraving, but I don't know how to set it up in one task? I'm using RGBL. Thank you for the advice,
Hello, someone gave me advice, I'm also troubled by this
Hello, did you find out anything more? Thank you
Hello, I have been working in the GRBL program for a few days (understand 2). I burn text into plastic labels with a laser. these are three lines with an area of 12 x 6 cm. When writing, the laser moves chaotically here and there and always burns out only part of a letter at once. It is possible to set the text to be written gradually (as if I were writing it letter by letter, word by word). it drives really senselessly and it takes a long time. I haven't figured it out yet. Thank you
Hello, I have an LSR2500TTM, can you please send me a photo of the table, what to enter for engraving and cutting leather and plywood, thank you very much