After a week, I welcome you again to the next part of the Synology DS218play review. IN past work we dealt with the station as such, we showed ourselves how the station looks (and not only from the outside), how it is worked with thanks to DSM, and we also got a taste of Cloud C2. Synology's Cloud C2 service will be covered today - I'll tell you the basics and how to work with it. No more waiting, let's get started!
It could be interest you
C2 cloud service
As the name suggests, this service deals with cloud backup. Cloud C2 is a service directly from Synology, so you can look forward to simple and intuitive operation just like in the case of DSM. If you are worried about your data even if you use RAID, Cloud C2 is just for you. It's true that you've already invested in a NAS as such, but that doesn't protect you in the event of, for example, hardware failure, human error, or other accidents where important data may be lost. Synology C2 Backup guarantees data availability in the cloud, and for a small fee you can enjoy the benefits of scheduled backup, multi-version support, and granular file-level restore on any operating system, including DSM. C2 Backup is a hybrid cloud - it is a combination of private and public cloud. The basis is a private cloud from Synology, on which the data is initially stored and only then goes to C2 Backup.
In addition, Synology boasts that it uses military-grade security for data encryption. You can enable AES-256 and RSA-2048 encryption in the settings. Without a private key known only to you, no one else, not even Synology, can decrypt your data. It's worth mentioning that C2 makes up to 11 copies of your files, so you're getting several times more storage than you're paying for. Synology C2 Backup is cheaper than any competition considering the amount of data stored in the cloud. C2 runs on servers in Germany, so it is subject to EU legislation.
How to set up C2 Backup?
Setting up C2 Backup really only takes a few minutes. I still can't believe how simple Synology has it all figured out. Everything is in the DSM and the control is so terribly simple and intuitive that even a trained monkey could handle it. Despite the simplicity, I will show you how to set up Synology's C2 Backup service.
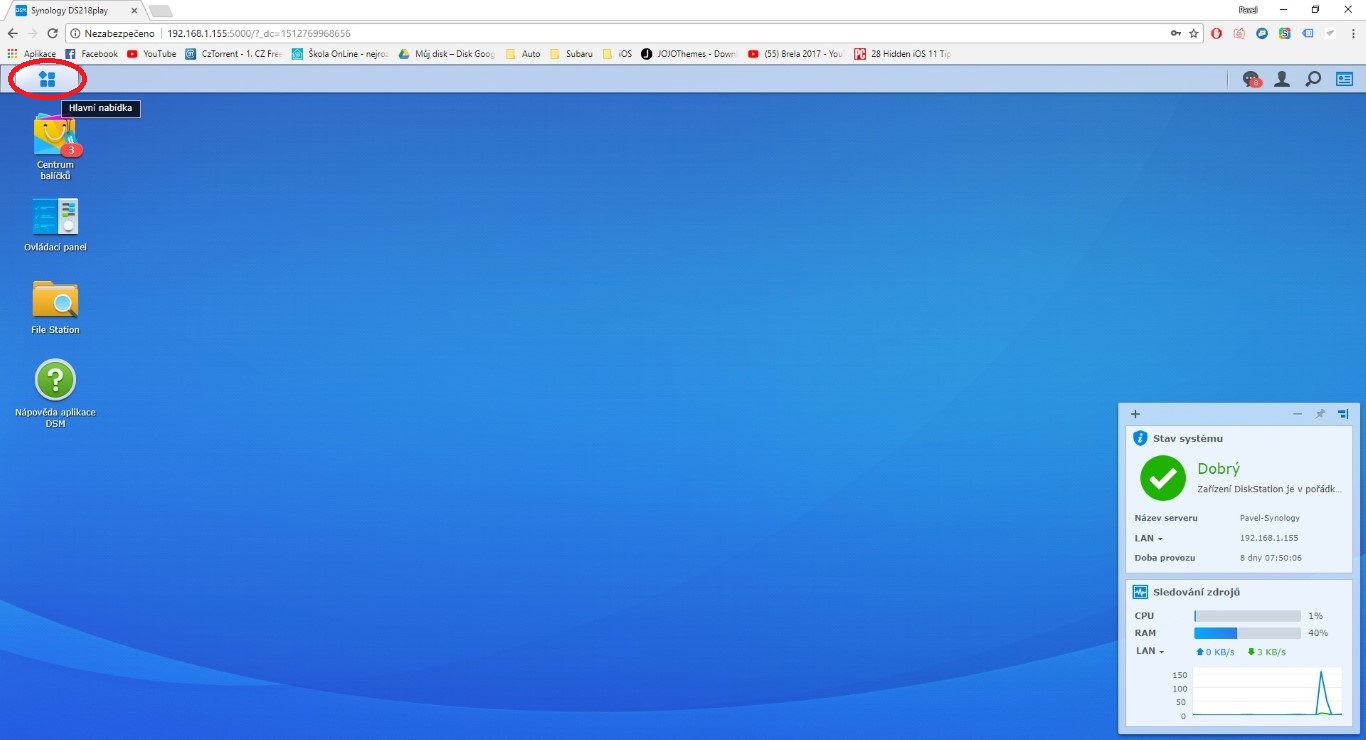
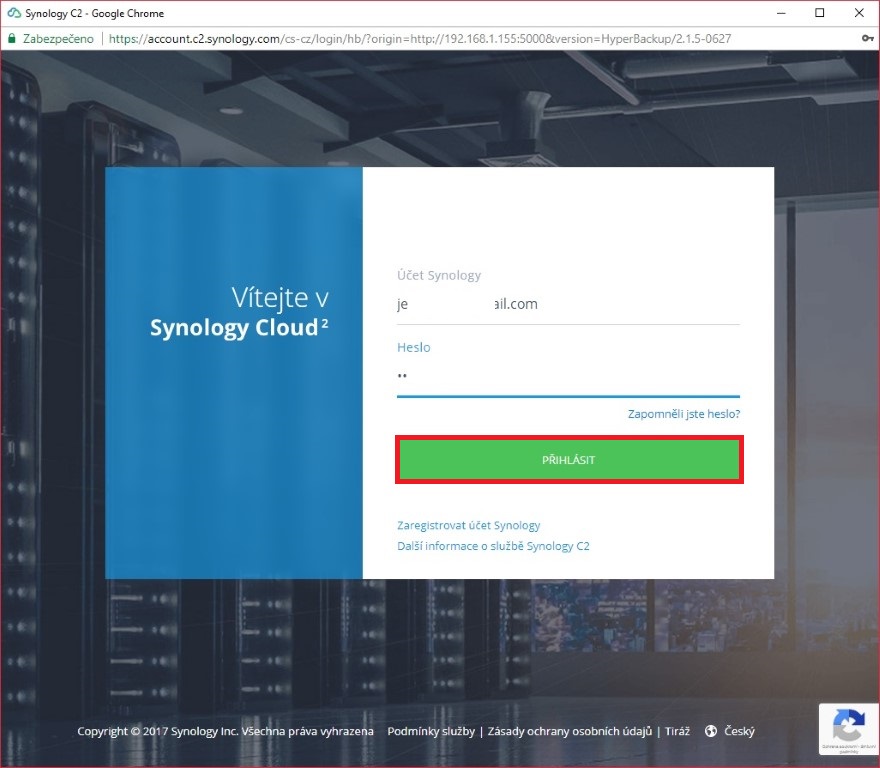
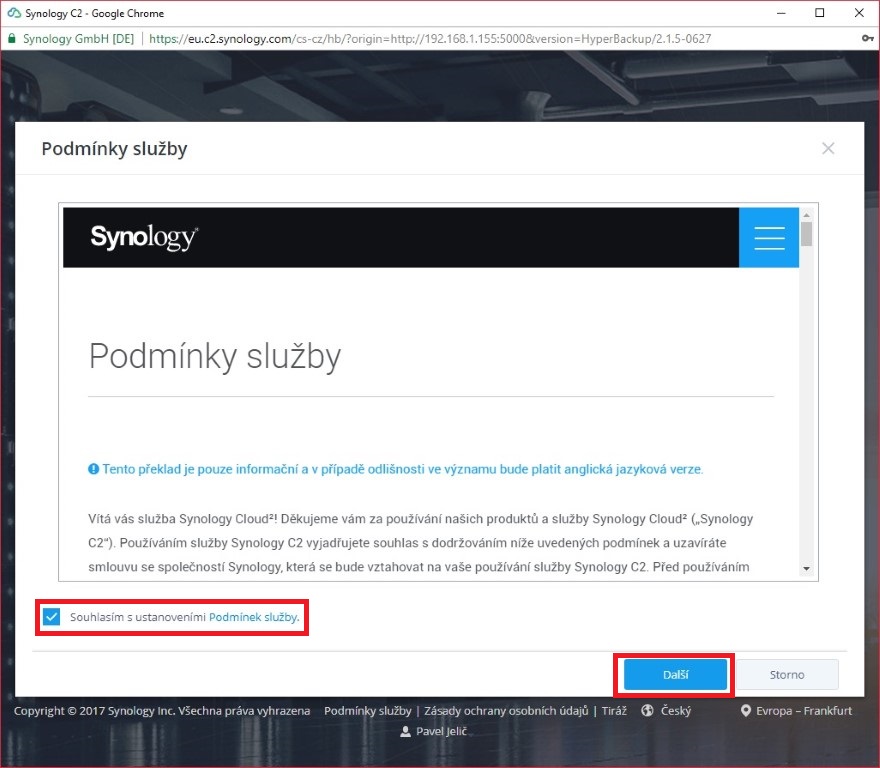
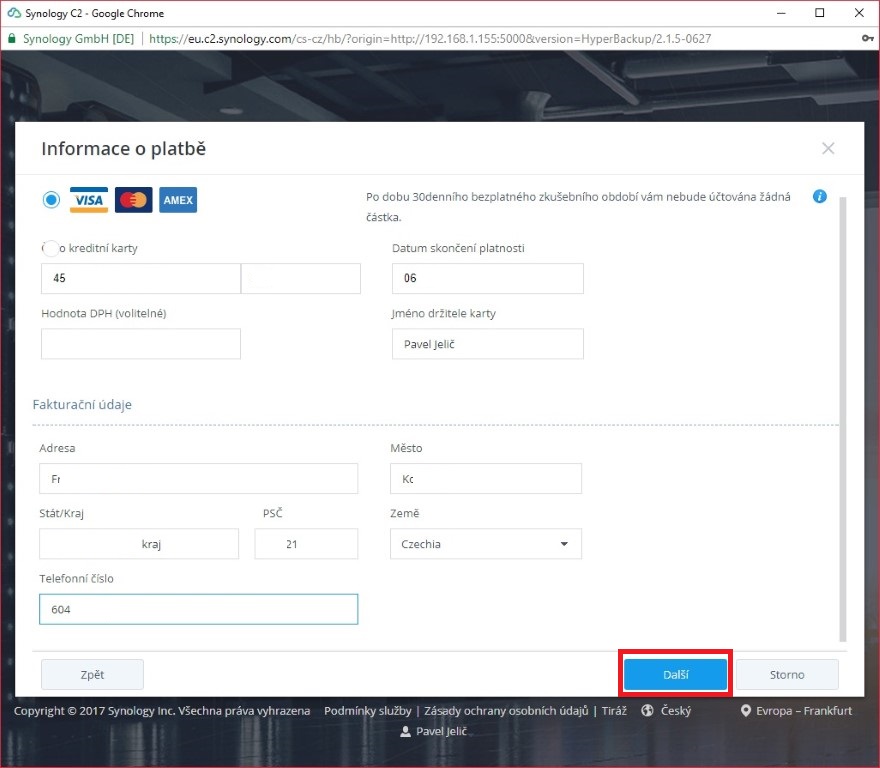
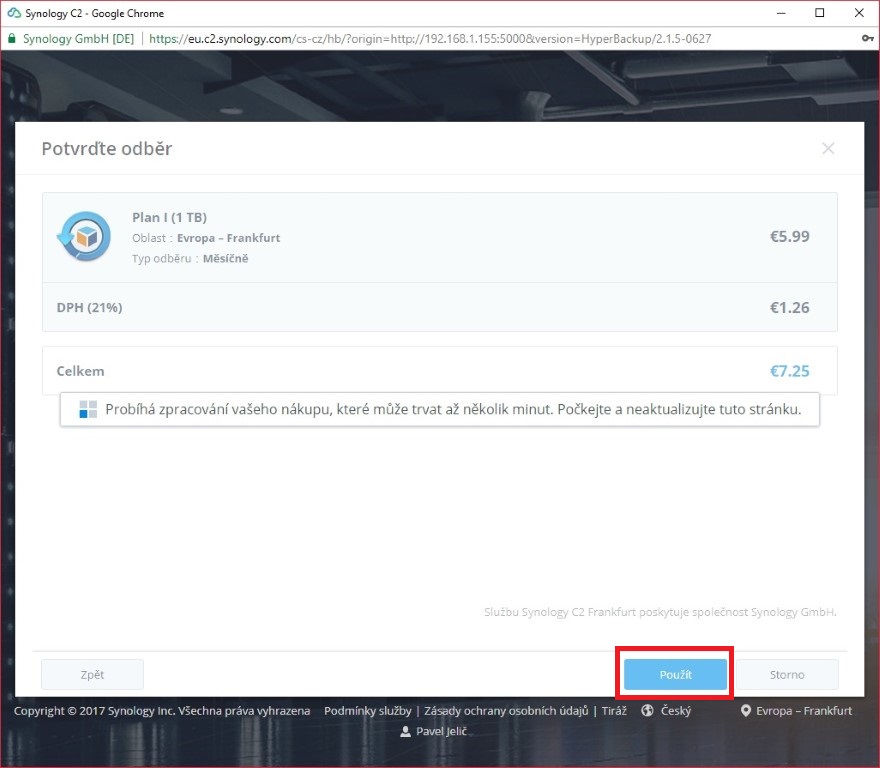
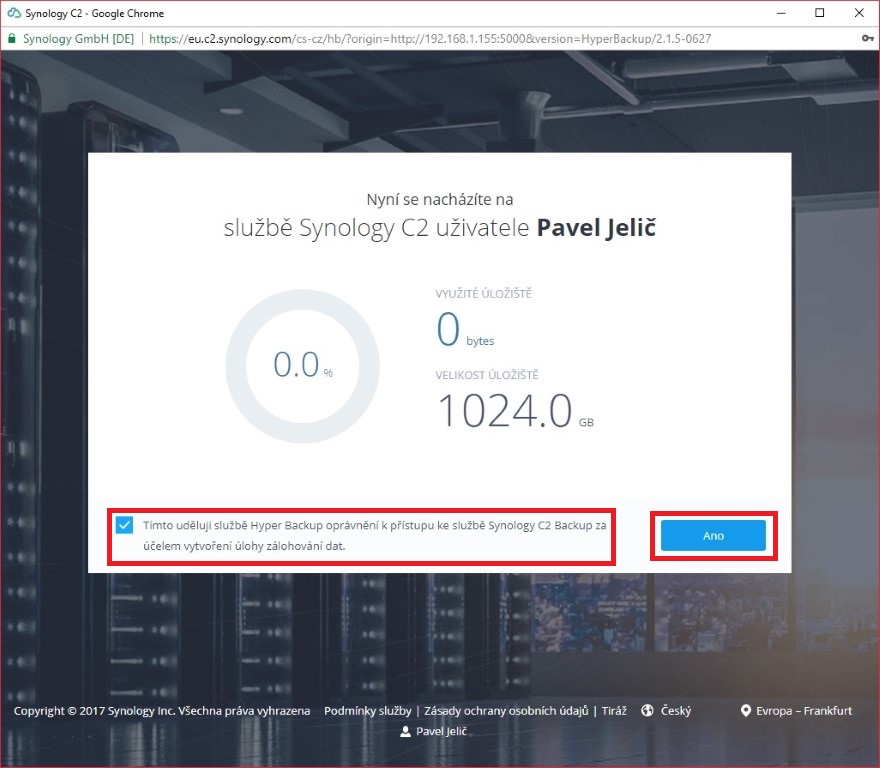
Through the link find.synology.com let's go to the DSM operating system of our Synology device. Classically log in as an administrator (or as a user who has administrator rights) and open in the upper left The main offer. Here we click on Hyperbackup and in the window that pops up at us, we choose Synology C2 and then we click on Další. Another window will open, this time asking us to signed in to our Synology account (if you don't have it yet, I recommend creating it on Synology's website). Then we click on the green button Log in. Synology will offer us the first 30 days free trial period, which we can use by clicking the button Take advantage of the free trial period. Read the terms and conditions and then agree to them by clicking on I agree to the terms of the Terms of Service and click on Další. Now we choose the tariff that suits us best. For example, I chose 1 TB for €5,99 per month. After selecting the tariff, click again Další and now we enter our payment card details, which we then confirm again with the button Další. Now we will check if we have selected the right tariff - if everything is fine, we will press the button Use. Now you just have to wait a while for the purchase to be processed and after a few seconds another window will appear. In this window we can notice our Synology C2 used capacity and we can also here grant Hyper Backup access permission, which of course we will do and click on Year. Now the window will close and we will find ourselves back in the DSM that has already prepared for us Backup Wizard.
Backup Wizard
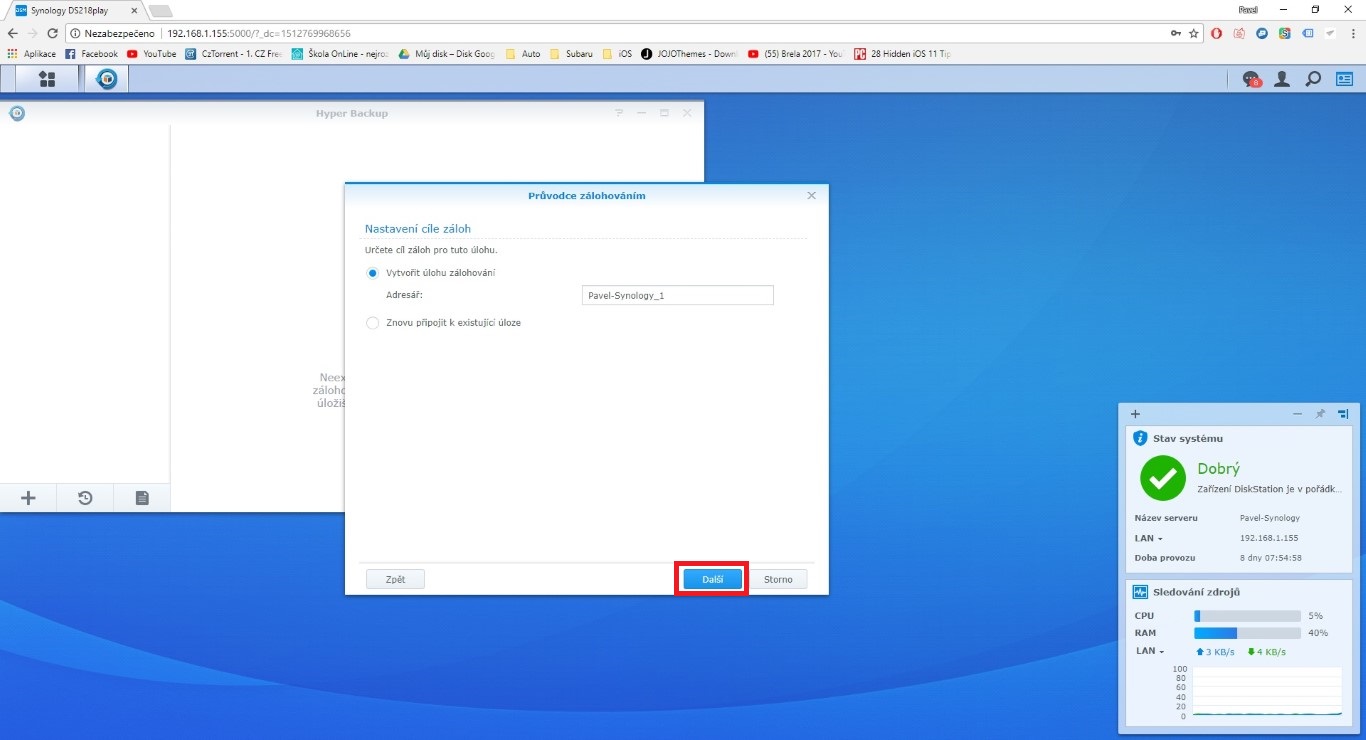
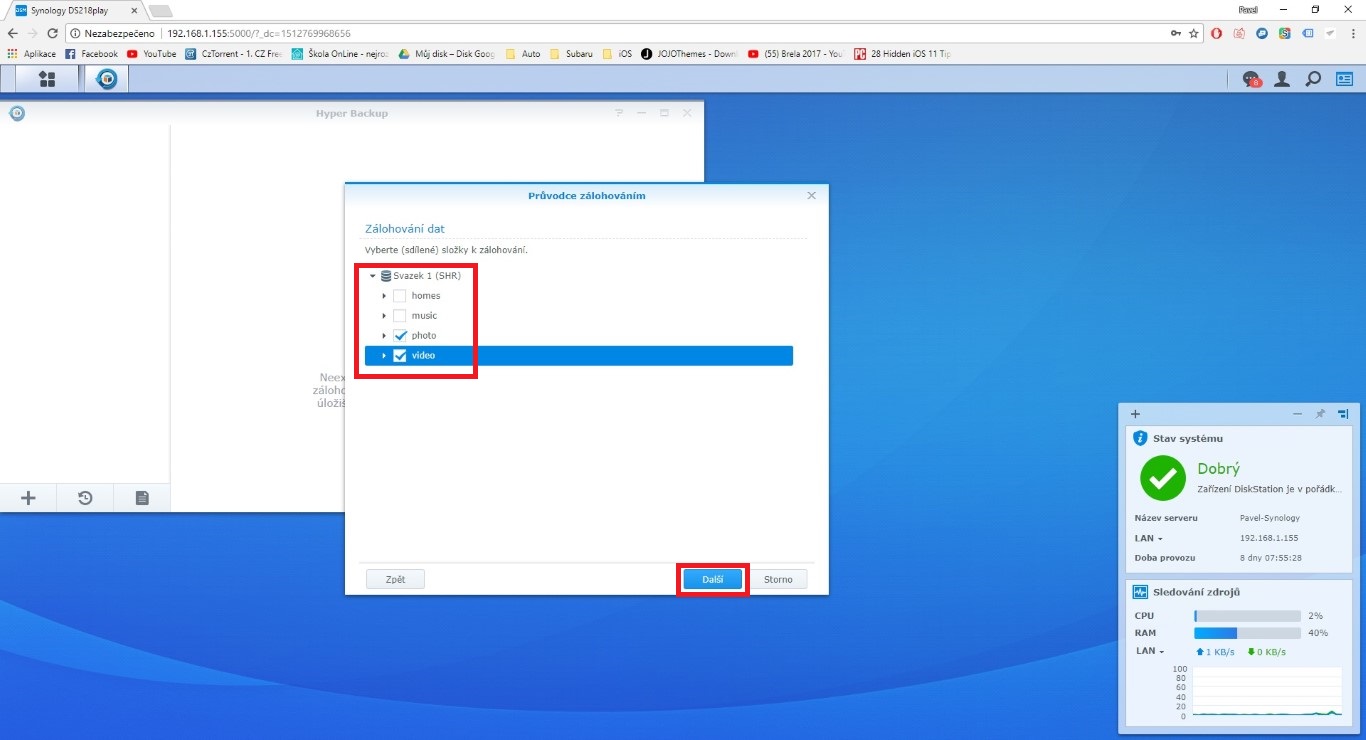
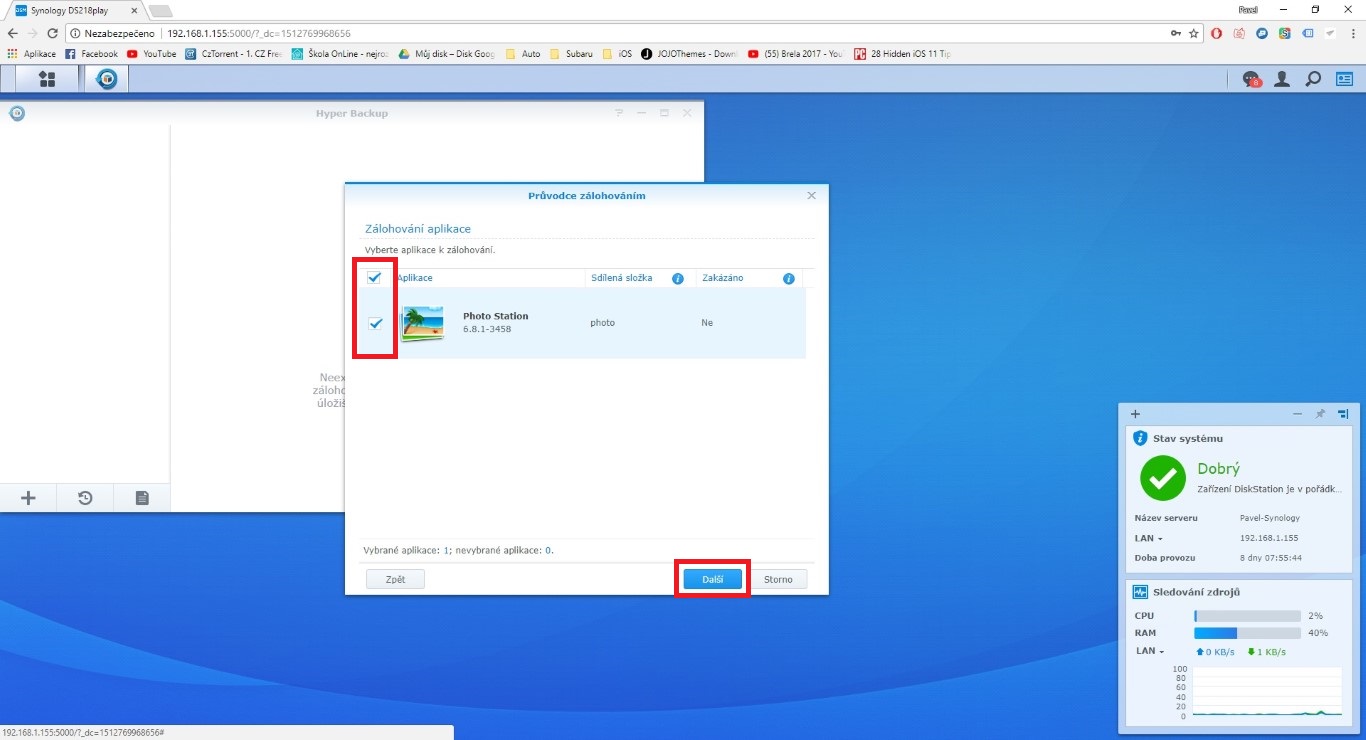
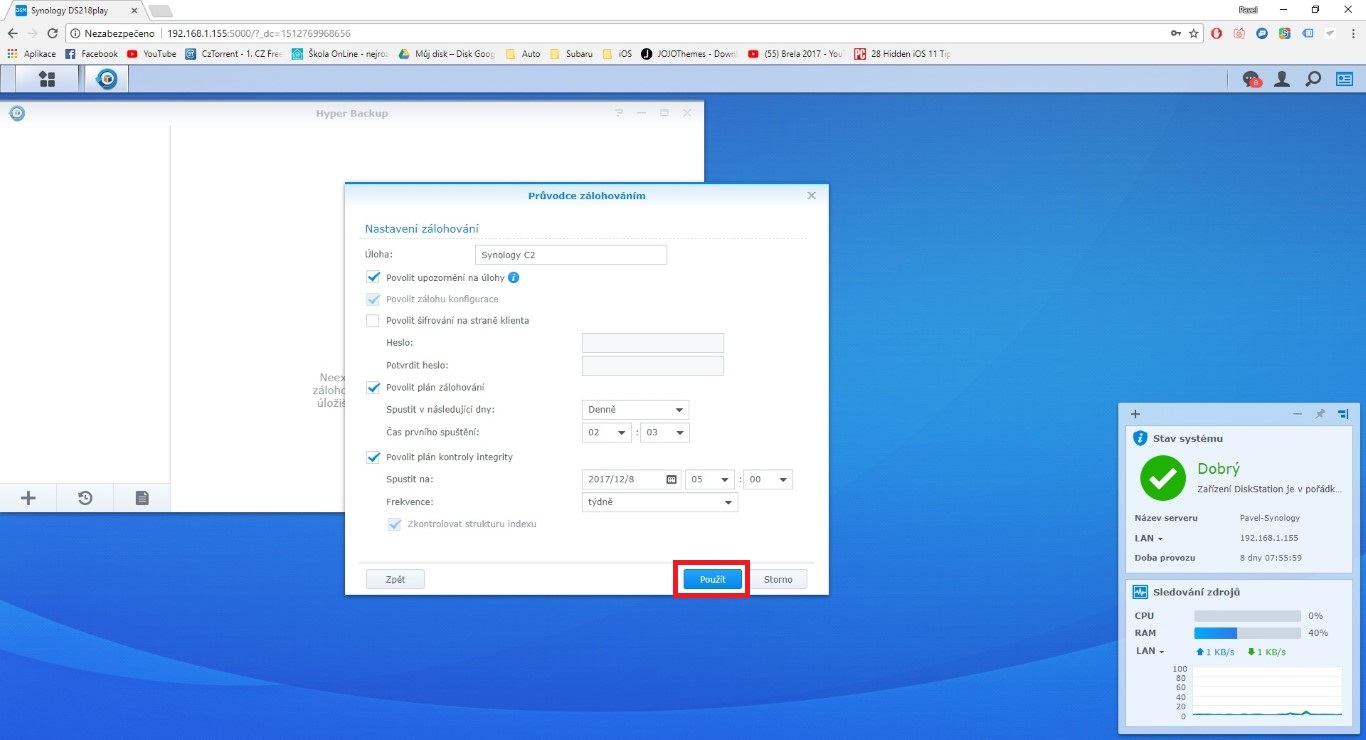
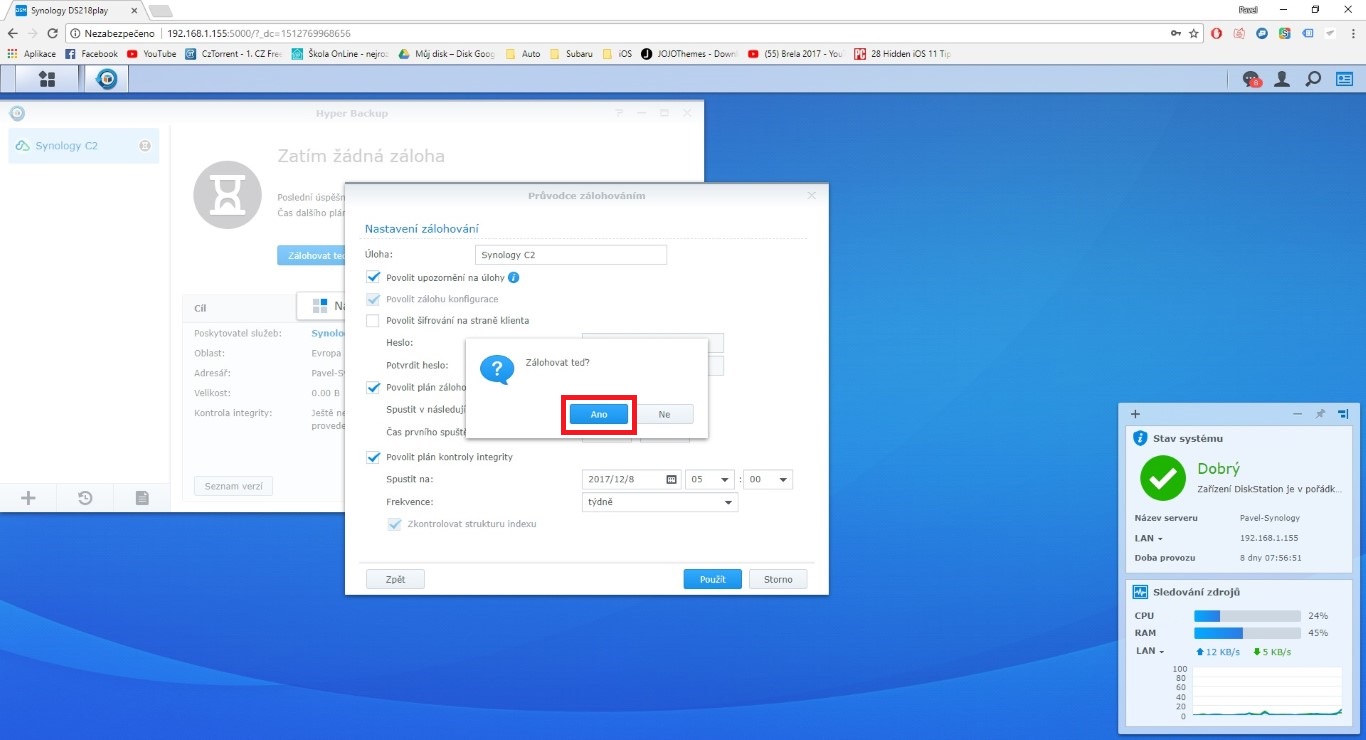
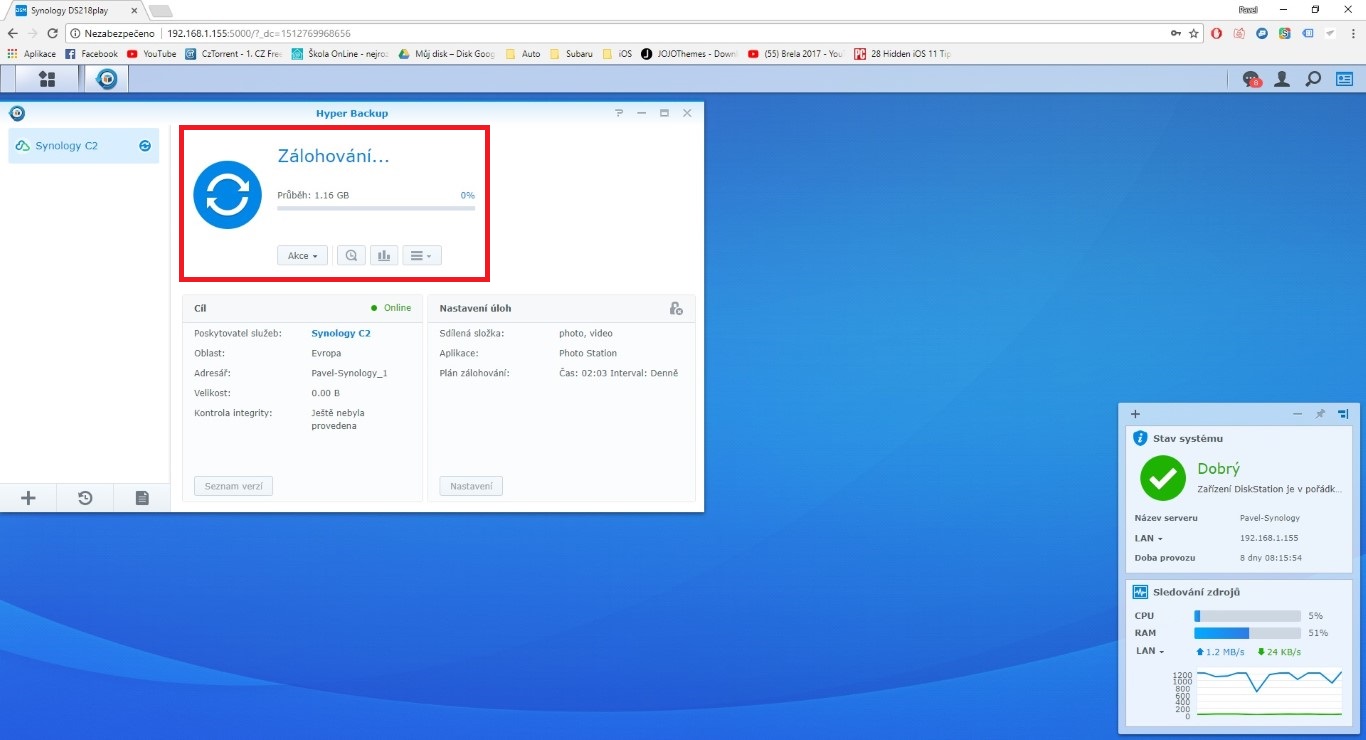
In the first step, we choose if we want create a backup job or if we want Synology reattach to an existing task. In my case, I chose the option Create a backup job, as I have never backed up my Synology before. We will confirm our choice and in the next step we will choose, which folders we want to back up. I personally chose photos and videos, what you back up is entirely up to you and what you store on your station. In the next step, we will choose the applications that we want to back up and confirm again. The next window deals more detailed settings. I didn't change anything here, as everything suited me as it was. If you want to change for example hour or days in which the backup should start, you can do so right here. If we also go through this setting and click further, the wizard will ask us if we want to start back up now – in my case I chose Year. A quick data check was done within a few minutes and then started instantly upload to the cloud. It really is that simple. Of course, if you have a large collection of movies and photos like I do, depending on the speed of your Internet connection, uploading to the Cloud can take several hours or even days.
What tariffs are available?
As with most cloud services, C2 Backup has several plans available. Before choosing, you should calculate how much data you will need to back up to the cloud and choose a tariff accordingly. Synology's tariffs are divided into Plan I and Plan II - what's the difference between them?
Plan I
Plan I offers daily backups with periodic retention, AES-256 data encryption, restore from any web browser, free storage for past versions, and many more features.
You can choose between:
- 100 GB; €9,99 per year
- 300 GB; €24,99 per year
- 1 TB; €59,99 per year (or €5,99 per month)
Plan II
Like Plan I, Plan II offers AES-256 encryption and recovery from any web browser. Unlike Plan 1, it allows for hourly backups, the ability to set retention rules, and deduplication, which will help remove all duplicate data from all backup versions and optimize storage usage.
- This plan works on the principle that you pay for every 1TB of space you use. The current amount for 1 TB is €69,99 per year, or €6,99 per month.
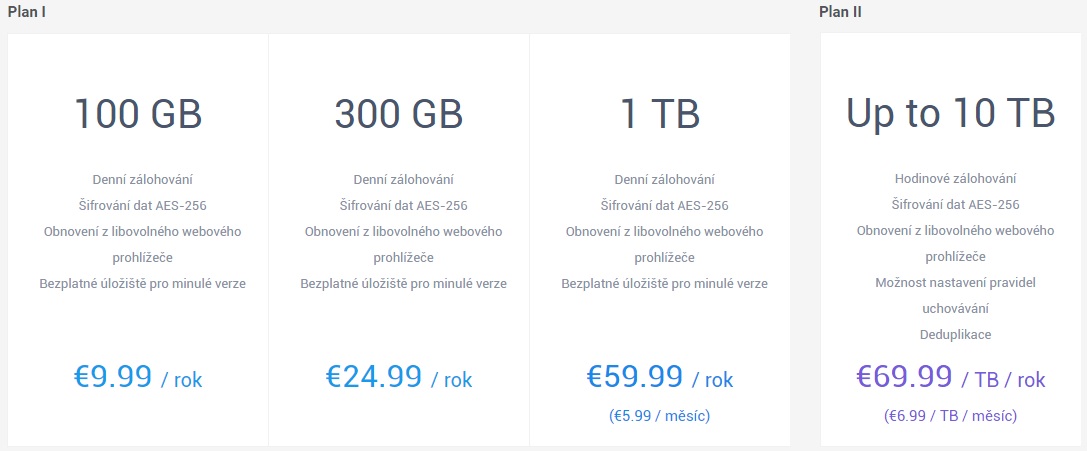
In short, if you only use Synology at home to back up photos and memories, you will definitely reach for the Plan I plan drawer. Finally, it should be noted that the prices are exclusive of VAT and final, so you don't have to worry about signing up and paying more than what you were told.
záver
Finally, I would like to commend Synology for trying to keep the whole system and process simple. Creating and paying for C2 Backup is a matter of a few minutes, and all this still confirms to me that Synology is the market leader when it comes to NAS stations. I really like Synology's C2 Backup, as I mentioned, mainly because of its simplicity. I recommend this service to everyone who is worried about their data, whether it is memories in the form of photos and videos or companies that need to keep their data so-called "in the dry". Backups are usually done the day after the crash - I recommend taking this "joke" more than seriously and I wouldn't delay backing up your data.




I quote "If you are worried about your data even if you use RAID, Cloud C2 is just for you.".
That fear is quite justified. It is necessary to realize that RAID is not a backup! He can collapse the volume and then there is quite a problem.
So RAID is not a backup and the Cloud is not a salvation. Most of the big ones are not contractually responsible in any way. Did you find out about TB family photos? Sorry. As compensation, we will offer a discount on services in the next year.
Another question is what control do you have over your data after you upload it somewhere. Minimal encryption before uploading would be appropriate.
And as far as RAID is concerned, I see using one disk for work and the other outside the network only for automatic snapshot storage as far more meaningful than RAID 1 on two disks.