The so-called SSD disks are undoubtedly the most widespread today and have easily surpassed the previously used hard disks (HDD), thanks to their higher read and write speeds, lower energy consumption and longer service life. It is therefore not surprising that even Apple has been relying on SSDs for years in the case of its MacBook Air and MacBook Pro computers, in which the disks take care of the overall performance improvement. The latest models even have an SSD connected to the motherboard.
Despite this, it can happen that the SSD drive in the MacBook encounters a failure where, for example, Disk Utility cannot even detect the drive. Something like this can happen with wear and tear. At the same time, a damaged SSD drives the risk of data loss on your Mac. What's worse is that SSD recovery is significantly more difficult compared to HDD, which we'll get to later.

If you notice that some files are missing from your drive, or if you delete them by mistake, you might be wondering how to recover them. In that case, this article is just for you. Together we will focus on how to get the lost data back.
Is it possible to recover data from MacBook SSD?
You can recover deleted files on Mac relatively easily using the Recycle Bin. But the problem arises if you have already dumped it and thus permanently removed specific files from the Mac's SSD drive. In such a case, recovery becomes significantly more complicated.
What happens when files are deleted
There is a fairly fundamental difference between the operation of an SSD and an HDD in cases where files are deleted. In the case where we delete files from HDD, the deleted files remain physically present on the disk until the particular sector is overwritten by something else/new. In practice, there is no such thing as "deletion" because the data is overwritten. Something like this then allows us to restore the data in an emergency. Besides, we have a lot more time for that.
However, it is different in the case of deleting a file from an SSD disk. If SSD TRIM is active, then the deleted file will be permanently deleted as soon as the computer goes to sleep. In this case, the sectors are being prepared for reuse. Specifically, TRIM is an Advanced Technology Attachment (ATA) command. If this feature is active, recovering deleted data from MacBook SSD will be all the more difficult.
How to check if TRIM is active
By default, MacBooks have SSD TRIM turned on. You can see for yourself as follows. Just choose the Apple icon () > About This Mac > System Profile from the top menu bar. Subsequently, from the left panel, select the section Hardware > NVMExpress and then you will see if u TRIM support written Year or not.
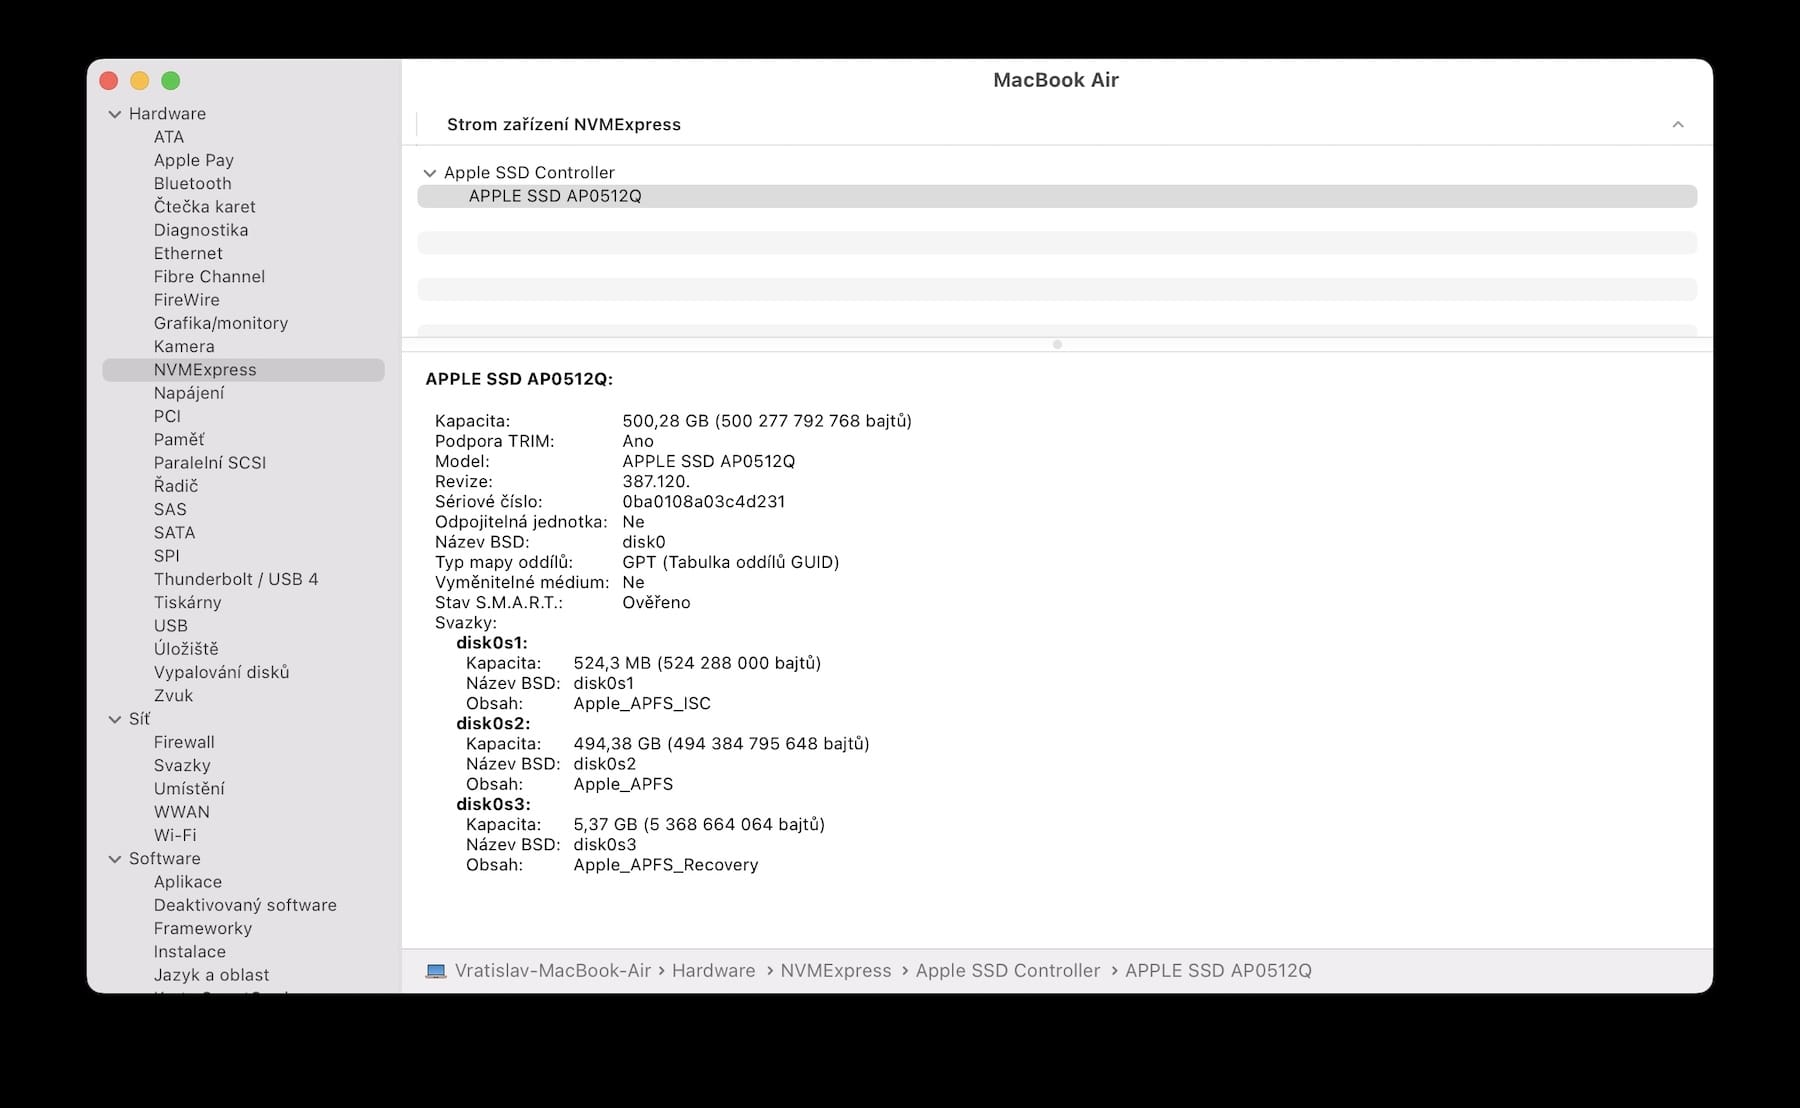
Can data be recovered from SSD when TRIM is active?
Of course, recovering data from a MacBook SSD is easier in cases where the TRIM function is disabled. On the other hand, something like that is rather unlikely, as most have it active. In this particular case, the SSD keeps specific information about the deleted files on its sectors until it receives a command from TRIM to "clean up" information that is no longer needed, or to delete it permanently. Thus, the disk does not delete the existing information until the new ones are written to the same sector, as is the case with the HDD. In such a case, data recovery is possible with high success rate.
So even if the TRIM function is active on the MacBook, you still have a chance to recover your data from the SSD. As already mentioned, the TRIM command is used to delete data that is no longer needed when the computer goes into an idle state, when no program is using it. Therefore, if the SSD has not yet passed through the TRIM function, there is still a chance to save the data. In such a case, you should quickly recover the data from the SSD - the sooner the better.
When you need to recover data from SSD MacBook
If necessary, it depends on several aspects, primarily on the users of the specific MacBook Air/Pro themselves. In some cases you may be aware of the risk of data loss, but in others you may not. Fortunately, it is enough to perceive certain signs informing about the potential risk of SSD failure, which can eventually lead to data loss.
That is exactly why we will now go through several possible scenarios and signs that may point to data loss. Respectively, they point to the necessity of restoring the MacBook's SSD, if it is actually possible in the given situation.
Permanent removal of files from SSD: Files can be permanently deleted from the SSD using one of four types of operations. When using the keyboard shortcut Option + Command + Delete; by selecting Delete Now; by manually emptying the Trash; or if the given file has been in the trash for more than 30 days.
Unintentional operation on SSD MacBook: In this case, accidental deletion of an APFS volume or container, disk formatting, defective storage, and in cases where a specific action damages the structure of the system file play a crucial role. All these activities can be responsible for data loss on your disk when all files are deleted.
Virus and Malware: Malicious computer software makes it impossible for you to use your device normally. A virus can do a lot of damage and even damage your Mac, steal personal data, delete files, and more. For this reason, this is the most common trigger of these data loss issues that are related to corrupted files due to a virus or malware attack. In this case, it is necessary to quickly restore the data and remove the viruses from the Mac.

Physical damage to MacBook SSD: For example, if the MacBook experiences a heavy fall, severe overheating or overheating, some sectors or even the entire SSD disk may experience damage. A damaged SSD disk subsequently endangers stored data.
In the case of the mentioned scenarios, it is recommended to restore the data from the SSD as soon as possible, as soon as the MacBook starts to experience, for example, flickering of the screen, or when it cannot be turned on at all, crashes, or struggles with a black screen. Likewise in cases where it is not possible to get past the loading screen. To avoid data loss, it is necessary to restore it as soon as possible.
How to recover data from SSD MacBook
As soon as you find yourself in a situation where you notice that some files are missing, or if you accidentally deleted some important data yourself, you should immediately stop all your work and avoid overwriting the deleted data. This will increase your chances of saving and restoring them. In short, you need to move to the recovery process as quickly as possible. So let's take a look at the most effective methods available to us.
Option 1: iBoysoft Data Recovery for Mac – Simple and safe option
SSD data recovery is a process that requires quality and capable software. Among the best, it is offered, for example iBoysoft Data Recovery for Mac, which is characterized by its reliability and efficiency.
This reliable and secure Mac data recovery software supports multiple types of data recovery, including recovery from APFS drives, formatted drives, SD cards, and damaged external hard drives. In such a case, it relies on three methods – fast recovery, better recovery and most efficient recovery.
How to recover lost data from MacBook SSD via iBoysoft Data Recovery:
- Restart your Mac in Recovery mode to avoid potentially overwriting data on your MacBook SSD.
- Select a network and stay connected to the Internet throughout the recovery process.
- Open Terminal from the Utility drop-down menu.
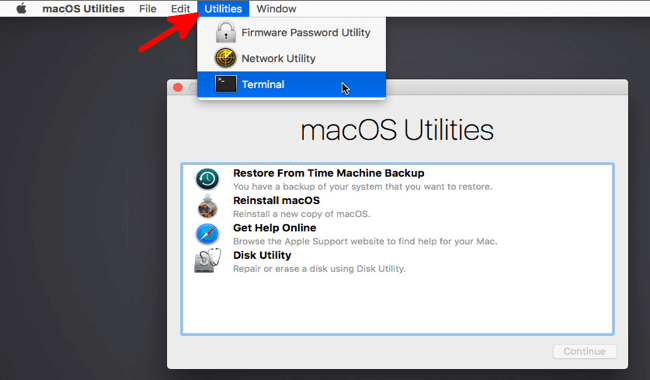
- Run the following command to turn on iBoysoft Data Recovery for Mac in Recovery mode. Command (without quotes): “sh <(curl http://boot.iboysoft.com/boot.sh)"
- Once the software is turned on, you can start data recovery.
- In the user interface, select the MacBook SSD from the available list.
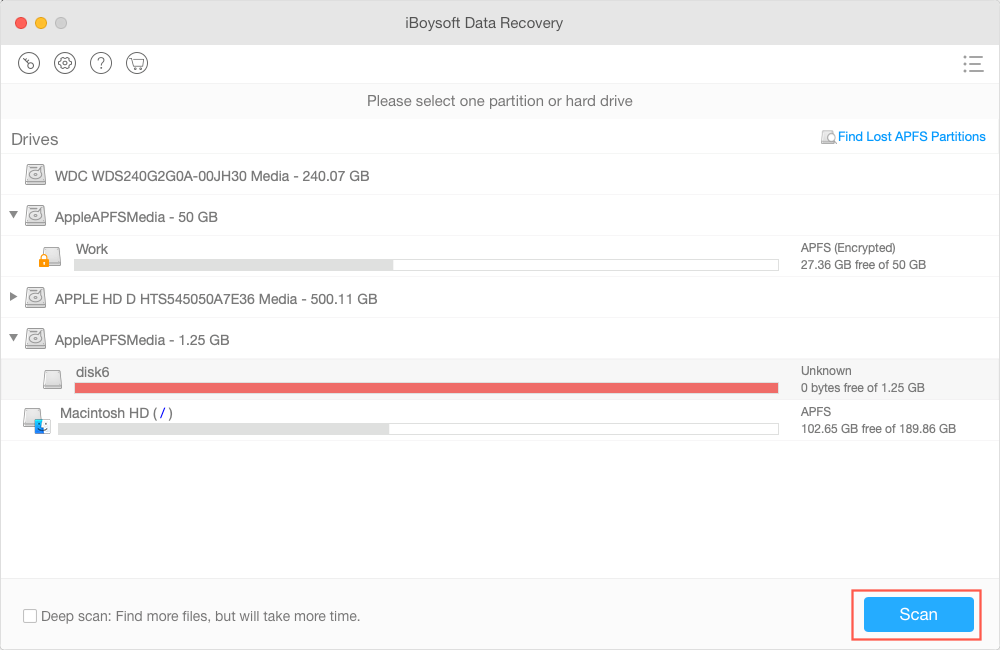
- Click the Scan button. The software will then start scanning for lost data that is still available on the drive.
- View the scan results and select which of the available files you wish to restore or recover.
- Use the Recover button to recover the marked files. Select the location where the data is to be restored afterwards.
iBoysoft Data Recovery for Mac is fully compatible with Mac OS 10.9 and later system versions, including the current macOS 12 Monterey. In addition, it works great on both platforms and can therefore recover data on Mac computers with Intel processors as well as Apple's own silicon chips (M1, M1 Pro, M1 Max, M1 Ultra and M2). At the same time, a free version of the software is also available, in which you can test whether it meets your expectations.
Option 2: Backup and Restore via Time Machine
The native Time Machine feature only works properly if you use it all the time - so it must be running before any data loss occurs. If you have backup resources available, the tool will automatically back up your entire Mac. With the help of Time Machine, you can then restore specific folders or even the entire system.
Therefore, check if you have Time Machine active on your MacBook. Just go to System Preferences > Time Machine and check the Automatically back up box. But keep in mind that in this case you need storage for the backups themselves. It can be an external disk or a NAS.
How to recover data from SSD MacBook with Time Machine:
- Connect the backup device to your Mac. Enter a password if required.
- Open the folder window where the files are stored.
- Click on the Time Machine icon in the top menu bar.
If you don't have the Time Machine icon in the top menu bar, you need to go to System Preferences > Time Machine and check the option Show Time Machine in the menu bar.
- Find a specific file from the timeline that you wish to restore with Time Machine.
- Select the desired file and press the space bar to view it using the quick preview.
- Confirm the operation by clicking the restore button. The file(s) will then be restored to their original location.
However, as already mentioned, it is always necessary to back up your Mac, especially in cases where you have important data stored on it. In this case, you can then avoid the inconveniences associated with data loss, for example due to a virus, physical damage to the Mac, and others. However, if you do not have any means for backup (external disk, NAS, etc.), use the option mentioned above in the form of the iBoysoft Data Recovery for Mac software.
It could be interest you

Option 3: Rely on the experts
However, it is possible that the damage on your MacBook is of a physical nature, or it is too serious, due to which the data from the MacBook SSD can be seriously damaged, or disappear altogether. This can happen when the disk is fatally overheated, the device falls, or it is severely worn. Therefore, the last option may be to turn to experts and hand over the device specialists who are directly involved in data recovery. Of course, this is the most expensive option, but a professional technician can better help with the problem.
Summary
MacBook Air/Pro is equipped with an SSD drive, which ensures better performance of the entire Mac thanks to better read and write speeds. On the other hand, an SSD drive is directly responsible for more difficult data recovery. Fortunately, there are still reliable methods available to solve these problems. As we mentioned above, you can use specialized data recovery software, solve the problem using the native Time Machine tool thanks to backups, or turn to specialized technicians dealing with this issue. The choice is up to each user.
Discussion of the article
Discussion is not open for this article.
 Flying around the world with Apple