I'll say it outright. British company Serif he just has balls! At the beginning of 2015, the first version of the application appeared Affinity Photo for Mac. A year later, a version for Windows also came out, and graphic designers suddenly had something to discuss. However, the plans of the British developers were not small at all. From the beginning, they wanted to compete with the giant from Adobe and their Photoshop and other professional programs.
I know many users who jumped right in after Affinity Photo. Unlike Adobe, Serif has always been at a more favorable price, that is, more precisely, disposable. The same applies to the iPad version, which debuted at this year's developer conference WWDC. Suddenly there was something to talk about again.
This is not the first time that developers have also created a mobile version of an application that is originally intended only for desktop. An example is for example Photoshop Express whether Lightroom Mobile, but this time it's completely different. Affinity Photo for iPad is not a simplified or otherwise limited application. It is a full-fledged tablet version that corresponds to its desktop siblings.
Developers from Great Britain have specially optimized and adapted each function to the touch interface of the iPad, they also added support for the Apple Pencil to the mix, and suddenly we have a professional application that practically has no competition on the iPad.
[su_vimeo url=”https://vimeo.com/220098594″ width=”640″]
When I started Affinity Photo for the first time on my 12-inch iPad Pro, I was a little surprised, because at first glance the whole environment mimicked too much what I knew from computers, either directly from Affinity or from Photoshop. And in short, I didn't really believe that something like this could work on the iPad, where everything is controlled with a finger, at most with the tip of a pencil. However, I quickly got used to it. But before I get to the detailed description of the application and its functioning, I will not allow myself a small detour to the general meaning of this and similarly focused applications.
Affinity Photo for iPad is not a simple app. For editing photos on Instagram, Facebook or Twitter, most of you don't need it, and rather can't even use it. Affinity Photo is aimed at professionals - photographers, graphic artists and other artists, in short, everyone who comes into contact with photos "professionally". Somewhere on the border between the simpler and professional applications is Pixelmator, because Affinity Photo does not even have this very popular tool functionally.
However, I do not want to categorize and strictly divide. Perhaps, on the other hand, you are fed up with simple adjustments and all kinds of colors and emoticons in your photos. Maybe you're also a beginner photographer and just want to take your editing seriously. In general, I think that every SLR owner should know a few basic adjustments. You can definitely give Affinity Photo a try, but if you've never worked with Photoshop or similar programs, be prepared to spend hours on tutorials. Fortunately, these are the content of the application itself. On the contrary, if you actively use Photoshop, you will feel like a fish in water even with Serif.

A real pro
Affinity Photo is all about photos, and the tools in the application are best suited for editing them. Just as they are completely tailored to the innards and capabilities of iPads, specifically the iPad Pro, Air 2 and this year's 5th generation iPads. Affinity Photo won't work on older machines, but in return you'll get the best experience on supported ones, because it's not a Mac port, but an optimization of every function for tablet needs.
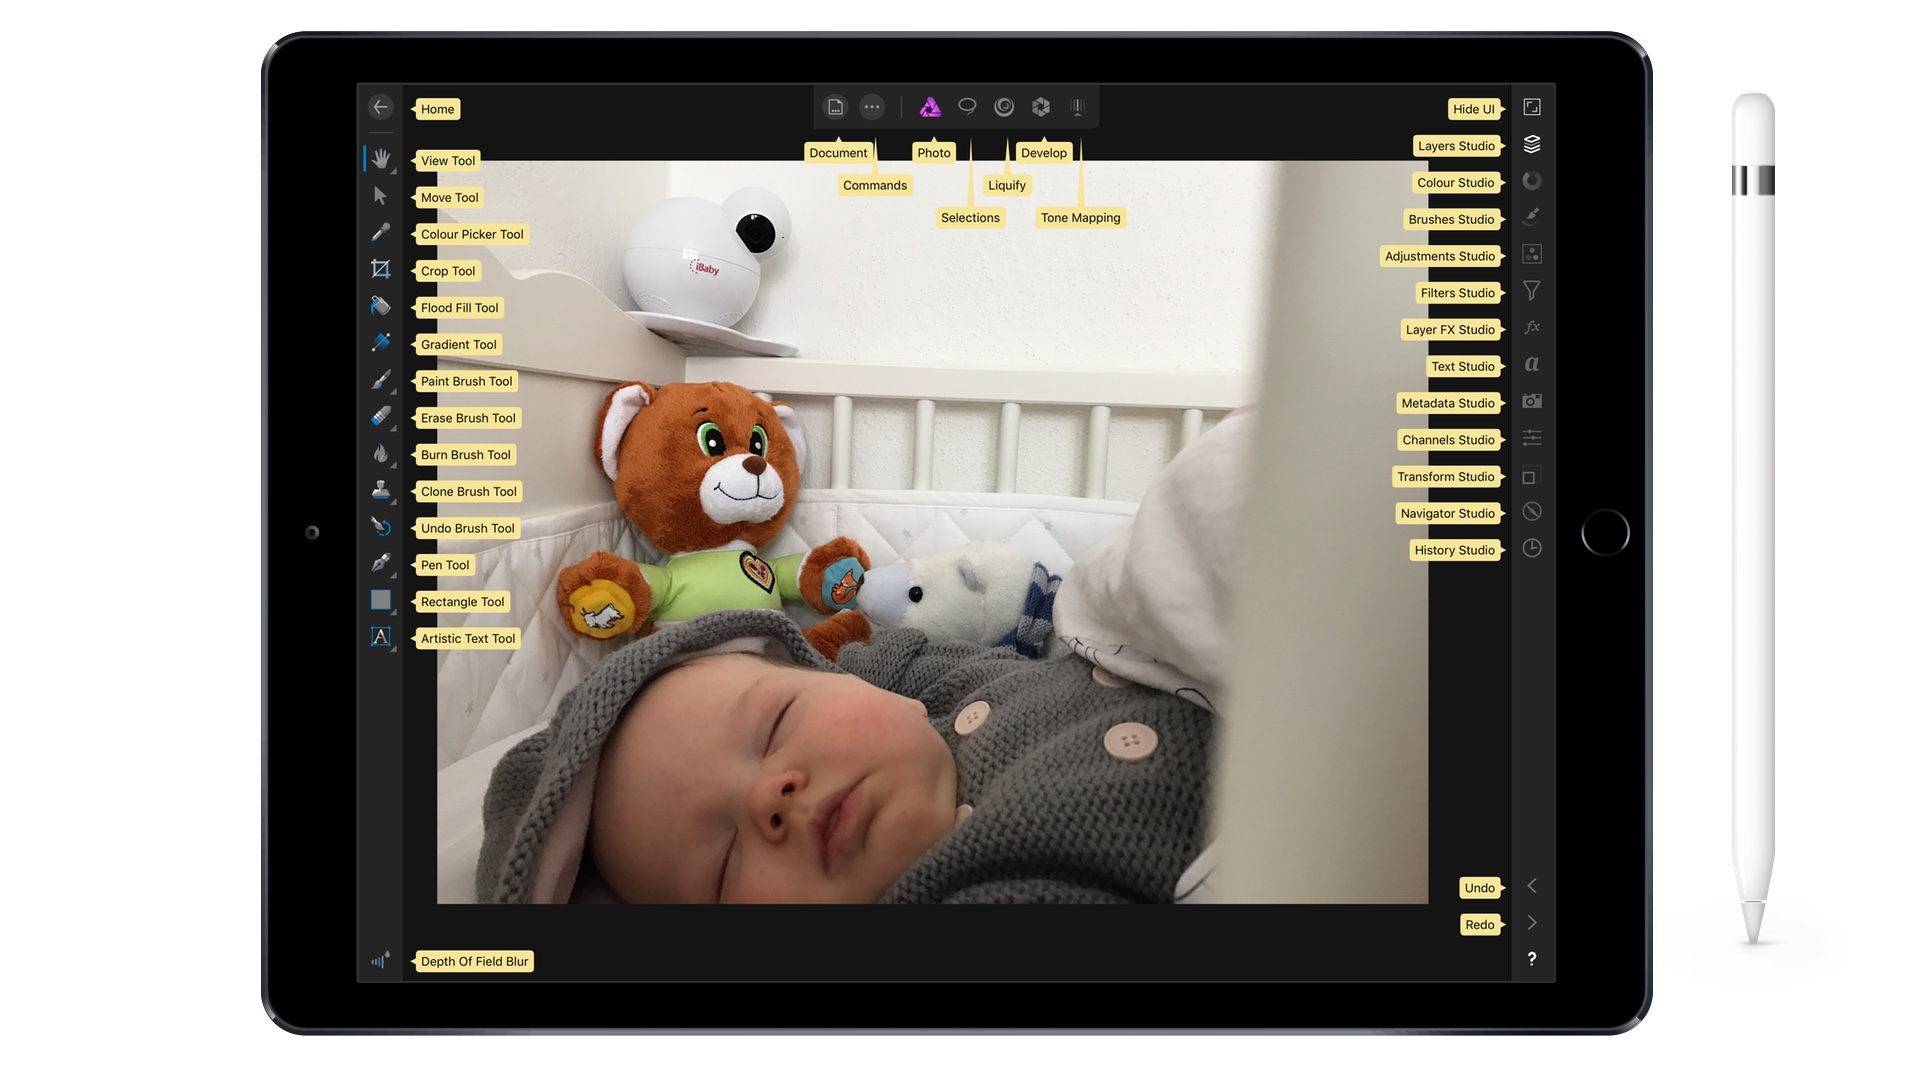
Anything you do in the desktop version of Affinity Photo, you can do on the iPad. The tablet version also includes the same concept and division of the workspace, which the developers call Persona. In Affinity Photo on the iPad, you will find five sections – Photo Persona, Selections Persona, Liquify Persona, Develop Persona a tone mapping. You can simply click between them using the menu in the upper left corner, where you can access other options such as export, print and more.
Photo Persona
Photo Persona is the main part of the application used to edit photos as such. In the left part you will find all the tools and functions that you know from the desktop version and Photoshop. On the right side there is a list of all layers, individual brushes, filters, history and other palettes of menus and tools as needed.
In Serif, they won with the layout and size of the individual icons, so that even on the iPad, control is really convenient and efficient. Only when you click on a tool or function, another menu will expand, which is also at the bottom of the screen.
A person who has never seen Photoshop or other similar programs will be fumbling, but the question mark at the bottom right can be very helpful - it immediately displays text explanations for each button and tool. You will also find a back and forward arrow here.

Selections Persona
Section Selections Persona it is used to select and crop anything you can think of. This is where you can make excellent use of the Apple Pencil, with which you can always select exactly what you really want. It's a bit more difficult with your finger, but thanks to the smart functions you can often manage it anyway.
In the right part, the same context menu remains, i.e. the history of your modifications, layers and the like. It was demonstrated very nicely at Apple's developer conference. Using the apple pencil, you can select, for example, a cutout of the face, soften and adjust the gradients, and export everything to a new layer. You can do anything in a similar way. There are no limits.
Liquify Persona and Tone Mapping
If you need more creative editing, visit the section Liquify Persona. Right here you will find some modifications that were also seen at WWDC. With your finger, you can easily and quickly blur or otherwise adjust the background.
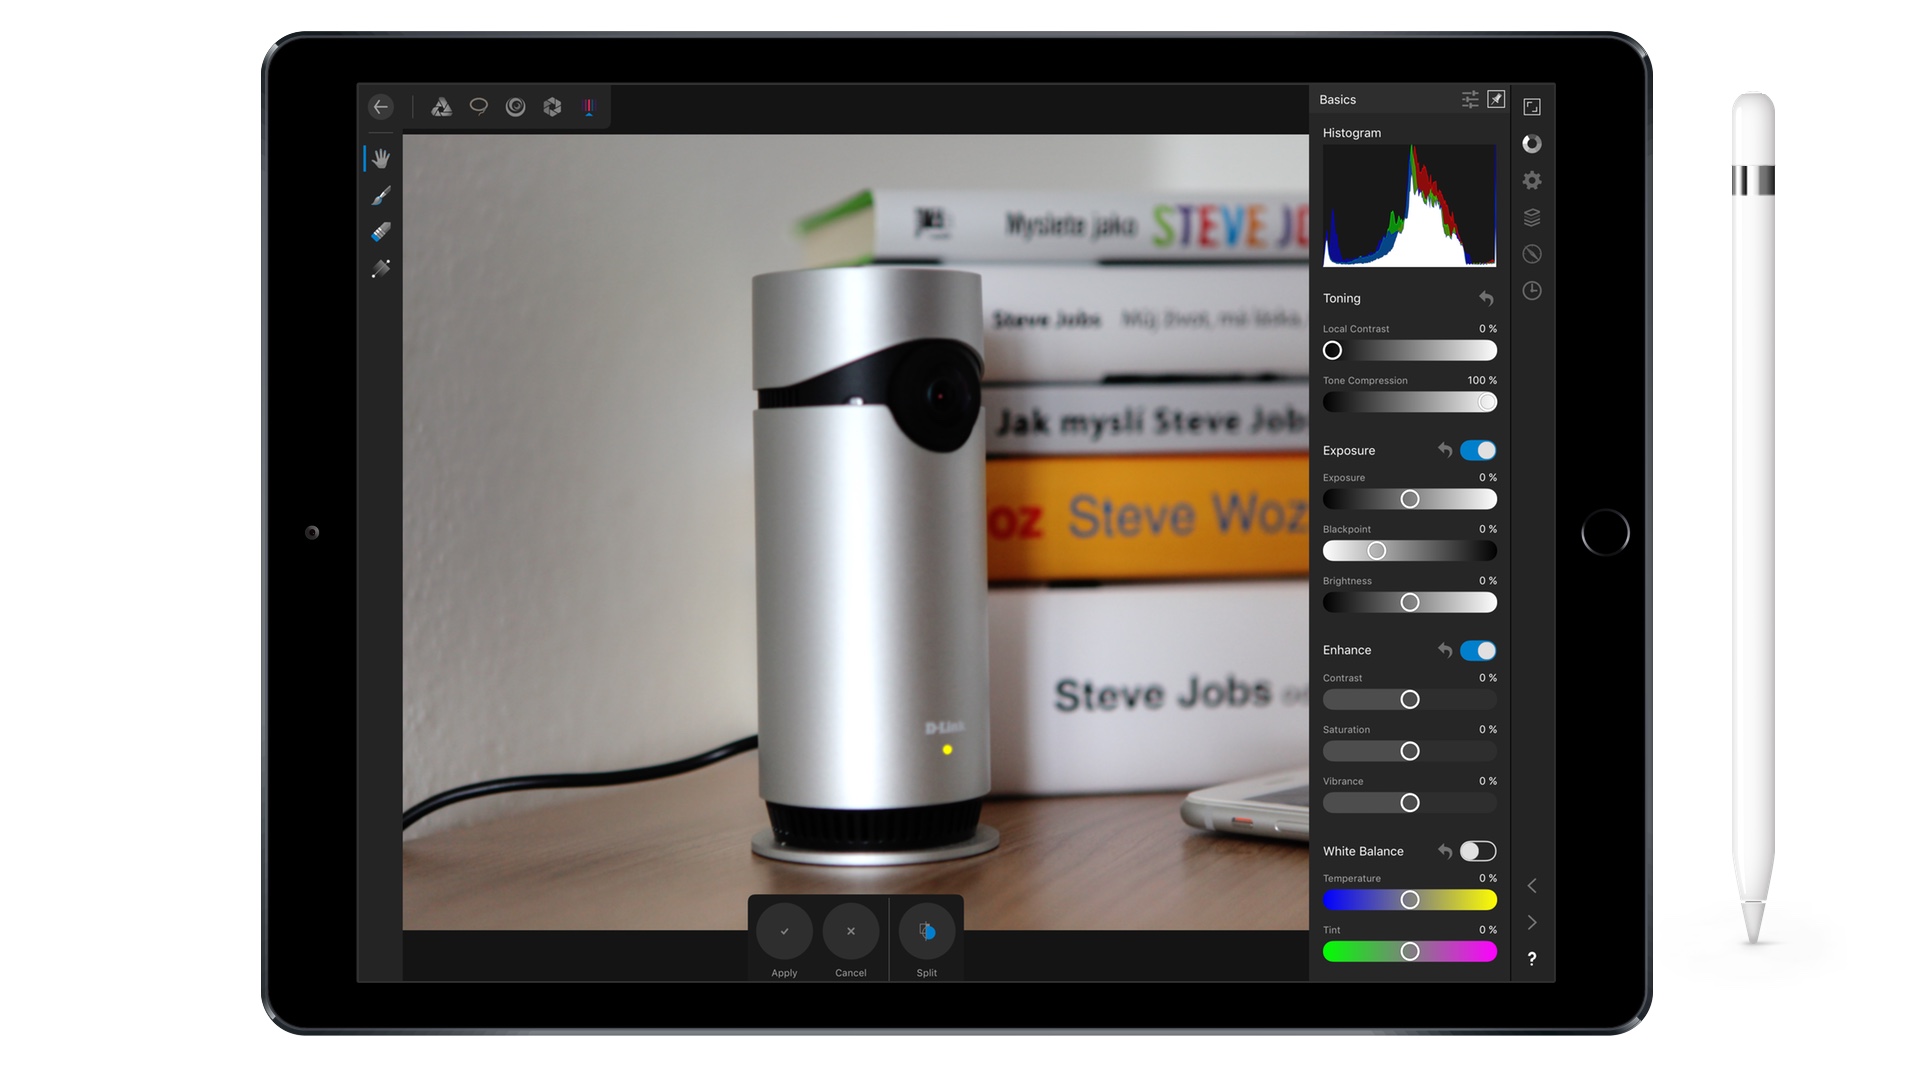
It is similar in the section tone mapping, which serves, as in other ways, to map tones. Simply put, here you can balance, for example, the differences between highlights and shadows in a photo. You can also work with white, temperatures and so on here.
Develop Persona
If you're working in RAW, there's a section Develop Persona. Here you can regulate and adjust the exposure, brightness, black point, contrast or focus. You can also use adjustment brushes, curves and more. This is where everyone who knows how to use RAW's potential to its fullest will be eliminated.
In Affinity Photo, creating panoramic images or creating with HDR is no problem even on the iPad. There is support for most available cloud storages, and you can easily send projects from iPad to Mac and vice versa via iCloud Drive. If you have Photoshop documents in PSD format, the Serif application can also open them.
Those who have never come into contact with Affinity Photo and only worked in Photoshop will come across a very similar and equally powerful and flexible layer system. You can also use vector drawing tools, various masking and retouching tools, a histogram and much more. It is quite surprising that the developers were able to present a full-fledged program for both macOS and Windows in just two years, as well as a tablet version. The icing on the cake is the detailed video tutorials that walk you through all the basic features.
The question arises whether Affinity Photo for iPad can be used as a single place to edit all photos. I think so. However, it mainly depends on the capacity of your iPad. If you're a professional, you know how fast a SLR memory card fills up, now imagine moving everything to an iPad. Perhaps it is therefore appropriate to use Affinity Photo as the first stop on the way to further editing. Once I have it edited, I export away. Affinity Photo instantly turns your iPad into a graphics tablet.
In my opinion, there is no similar graphic application on the iPad that has such a great potential of use. Pixelmator looks like a poor relative to Affinity. On the other hand, for many people the simpler Pixelmator is enough, it is always about the needs and also the knowledge of each user. If you're serious about editing and working like a pro, you can't go wrong with Affinity Photo for iPad. The application costs 899 crowns in the App Store, and now Affinity Photo is on sale for just 599 crowns, which is a completely unbeatable price. You shouldn't hesitate to make sure you don't miss out on the discount.
[appbox app store 1117941080]
The app is excellent. It's just a shame that Apple screwed up Photo Library, so it's not for any systematic work without a cooperating professional photo library. If you don't want to have each photo 2x. Or at least I haven't figured it out yet. Why older iPads are not supported is a mystery, after all, it is not about real time editing and rendering of a digital film, but in most cases about multiplication of matrices - I would prefer a pencil. Well, iOS is a lagging penalty on the latest iPad mini.
I'm not a professional photographer, but I took a picture. Every time I edit something in Affinity, I absolutely enjoy it! Everything is intuitive and learning was easy.
Even the price is unbeatable considering that, at least for me, it is the best app in the category! :-)
Affinity on PC/Mac is great as a Photoshop replacement (I've tried), but it doesn't make a bit of sense without some sort of replacement for Lightroom in terms of catalog management etc.
Lightroom is quite worthwhile in the form of a subscription, when for the resulting price only slightly higher than the price of bare LR, we also receive full Photoshop and quite interesting and usable cloud galleries. So if you need LR, I really don't see much room for Affinity.
In this regard, the currently reviewed version for iPad is probably more interesting, I really don't see much competition there.