With the advent of digital technologies and social networks, the sharing of images and photos has spread at an incredible pace. It is therefore quite normal for many people's computer and laptop storage to be full of all sorts of images. In theory, however, an accident can happen relatively easily, when you can accidentally delete these files, in the worst case, even permanently. What to do if you find yourself in such a situation? If you have discovered this article, then you have nothing to worry about. Together it now looked at how to recover permanently deleted photos FREE on Windows.
How to recover permanently deleted photos for FREE in three ways in Windows
We will show you three proven ways to recover your permanently lost photos on Windows. We also have to mention right from the start that all the methods are functional and useful while they are available completely free of charge.
- Recover permanently deleted photos for free with data recovery software
- Recovering permanently deleted images via File History in Windows
- Restore permanently removed images with Restore Previous Version
How to recover permanently deleted photos before free data recovery software
The easiest and most effective way to recover permanently lost photos on Windows is to use specialized data recovery software. But there is a fundamental question here. Is it difficult to use? In this case, it depends on the software. Some may be more professional, others simpler for quick use. That is why we would like to present you with a practical tool WorkinTool Data Recovery.
Therefore, let's go through the entire process of recovering permanently deleted photos together with the help of WorkinTool Data Recovery.
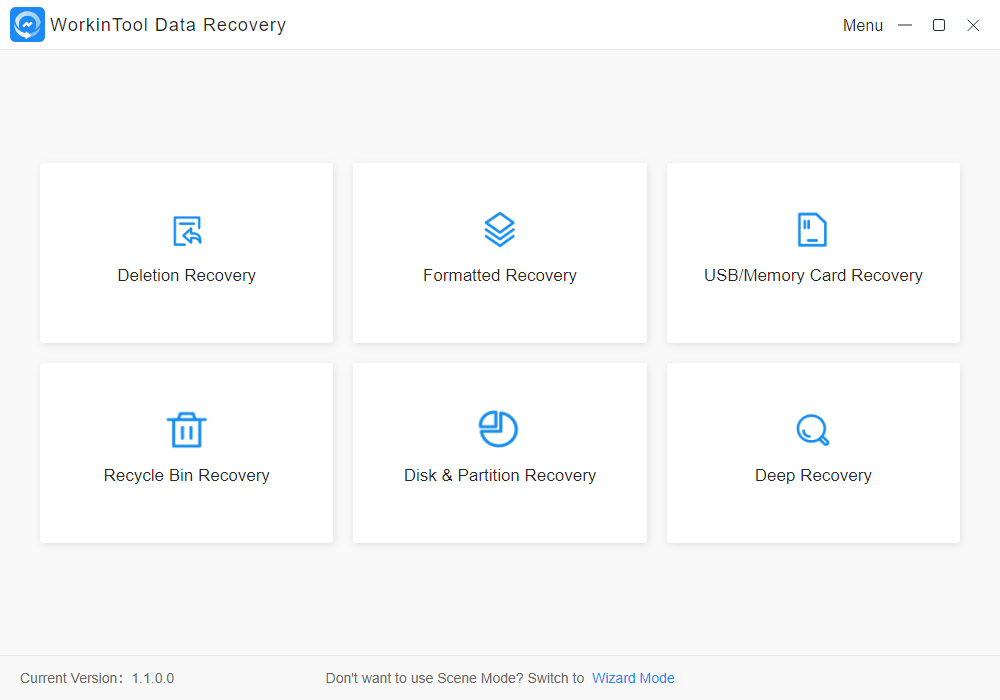
1 step: Open WorkinTool Data Recovery and select the recovery option.
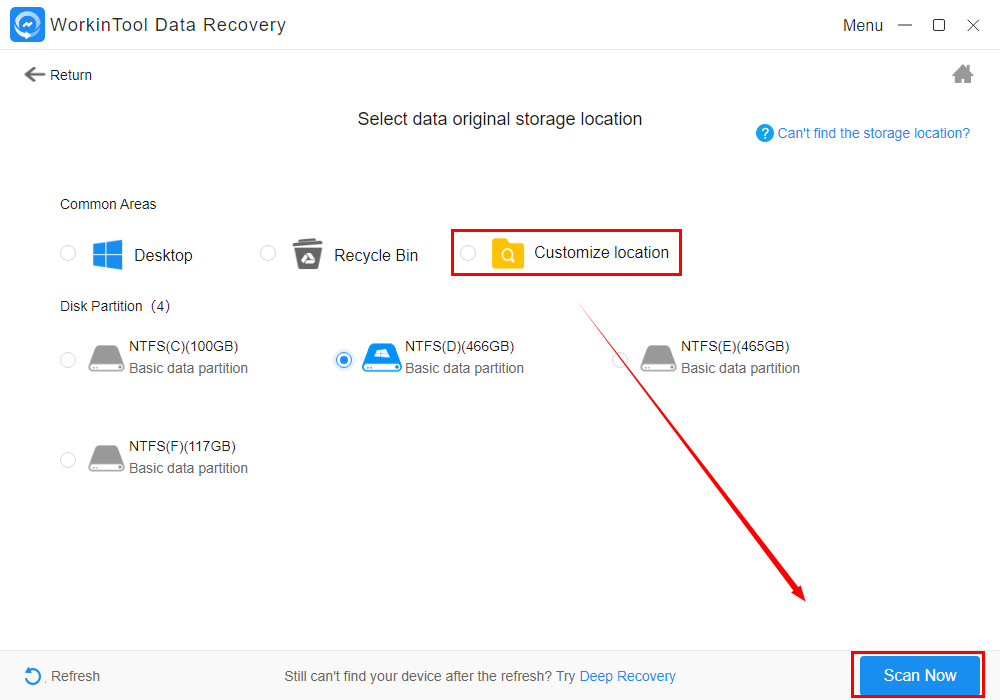
Step 2: Select the location to recover lost photos and then click the button Scan Now.
Step 3: Two methods are now offered:
- Either tick the option Picture, select all formats and then confirm the selection with the button Recover.
- Or go to Filter > Picture > Sure and then tap on Recover.
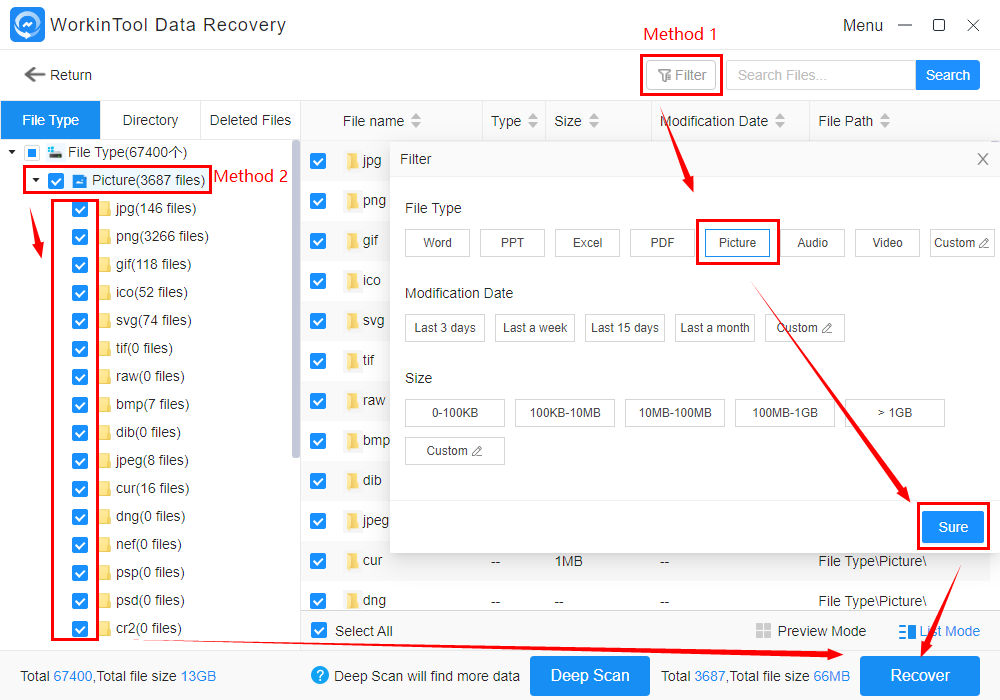
Another option is the so-called Deep scan, which can help you find much more lost data. This is a suitable option when a quick scan does not achieve the required effect.
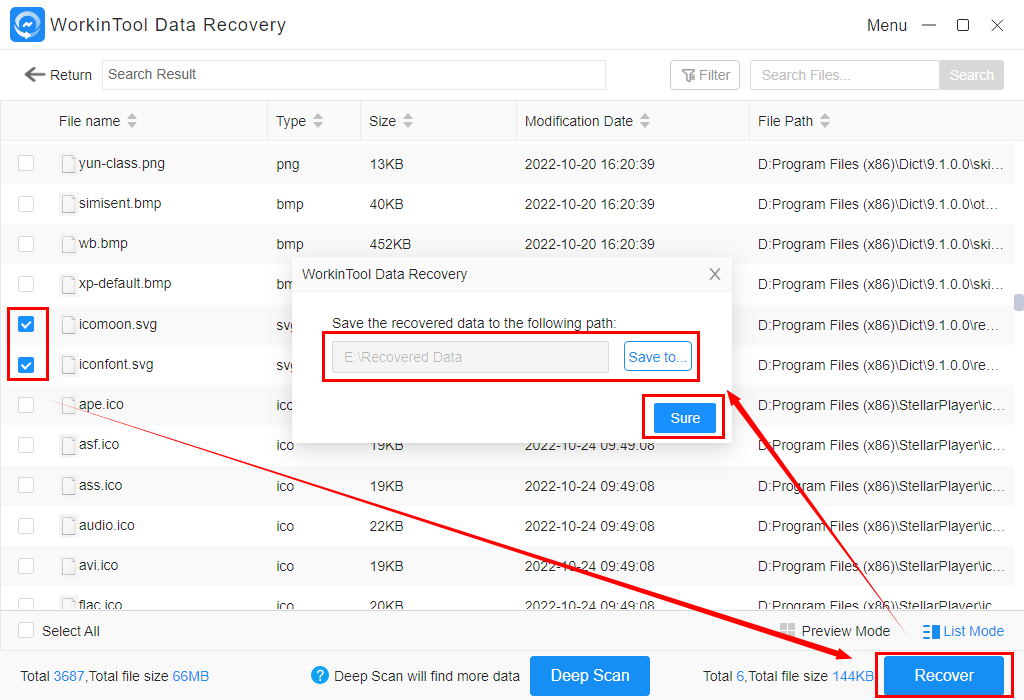
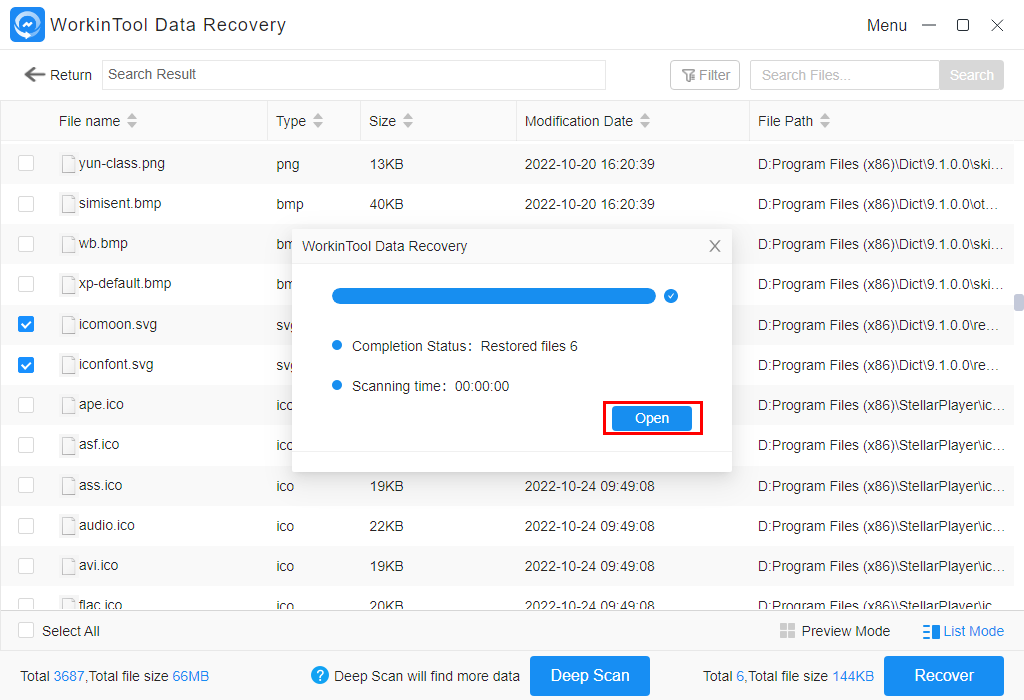
Step 4: Select all the photos you want to recover, set save path and confirm the choice via Sure > Recover.
Step 5: Click Open to open the folder where all your recovered photos are saved.
Quick summary of WorkinTool Data Recovery
WorkinTool Data Recovery is a relatively new but extremely important addition to the product family Working Tool. They are inspired by simplicity and practicality, which is why simple use is key for them, which even beginners can handle with ease. On the other hand, efficiency has not been forgotten, thanks to which the software solves practically all problems associated with data recovery. So, if you need to recover lost or permanently deleted photos, there are two practical ways: Quick Scan and Deep Scan. Whichever one you choose, you are virtually guaranteed to recover the entire batch of lost files.

Product specifications:
- Price: 100% free
- Supported OS: Windows 11, 10, 8 and 7
- Data Recovery Ability:
- Documents (Word, Excel, PowerPoint, TXT, etc.)
- Images (JPG, JPEG, PNG, GIF, BMP, SVG, TIF, TIFF, PSD, EPS, RAW, etc.)
- Audio (MP3, WAV, WMA, FLAC, etc.)
- Video (MP4, WMV, MKV, MOV, AVI, M4V, etc.)
- Archives (ZIP, RAR, JAR, 7z, etc.)
- Emails (EDB and PST)
- Next (DAT)
Evaluation

How to recover permanently deleted pictures via File History in Windows
File history is a native feature in Windows 10 and Windows 11 operating systems. It can help you recover recently deleted photos, but it must be activated in the settings, specifically in the backup section. But we must mention right from the beginning that the result in such a case is not as certain as when using a professional data recovery tool.
Let's go through the process of recovering photos with File History again:
Step 1: Open the folder from which you permanently deleted the photos.
Step 2: Type in the search field File history
Step 3: Tap the option Restore files using the File History service
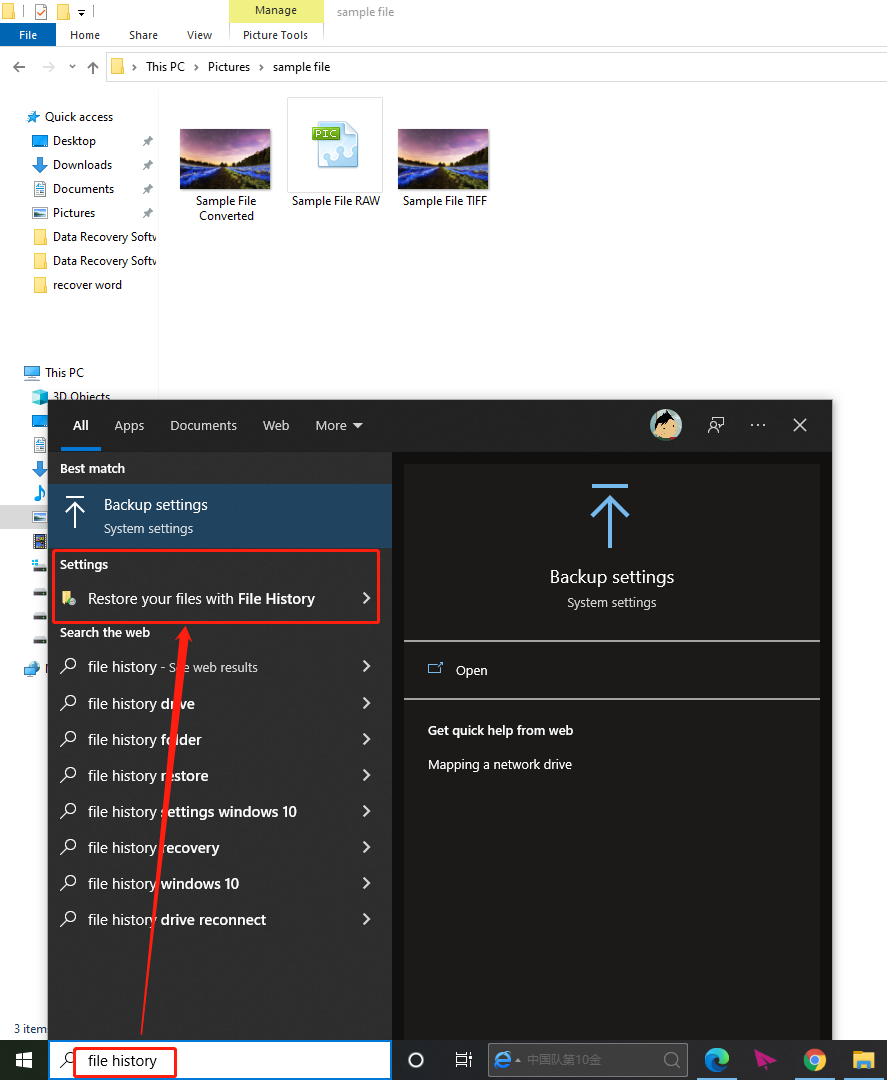
Step 4: Find the folder where the photos were deleted
Step 5: Click on the green circle icon to show you the files before they are deleted
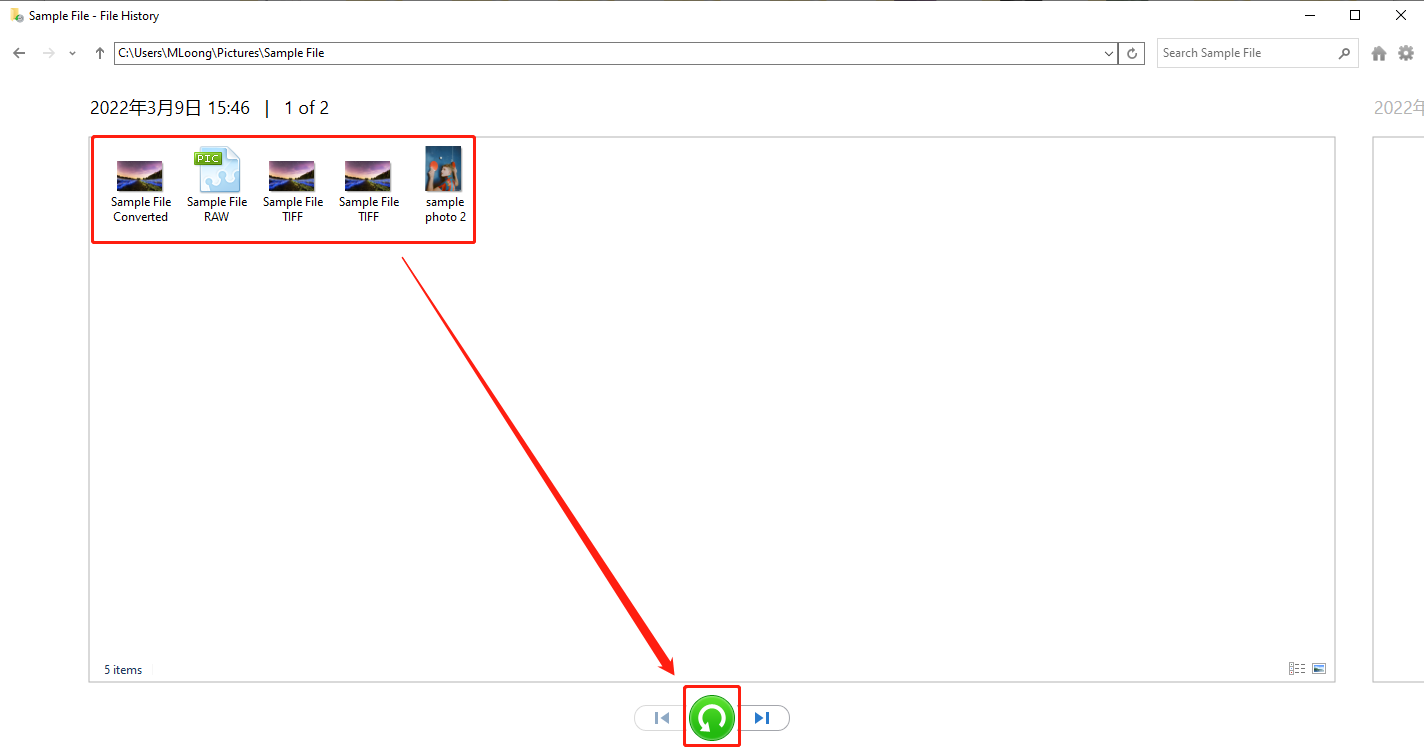
Step 6: Click on the option to replace files in that destination to get your deleted photos back

Warning:
- This feature only works if you have already activated it
- The result is uncertain. Your files may not be restored if you continued to use the folder after deleting the photos
How to recover permanently deleted pictures via Restore Latest Versions
Restore latest version is another great feature that is already available within the Windows operating system. At the same time, it can be seen as a way to create backups. Despite this, even here the result is not so certain. Your images can be unrecoverable this way if the data in that folder has already been overwritten.
With the Restore Latest Versions feature, permanently deleted images can be recovered in just a few steps.
Step 1: Right click on the folder where we originally stored the deleted photos and select the option Restore latest version
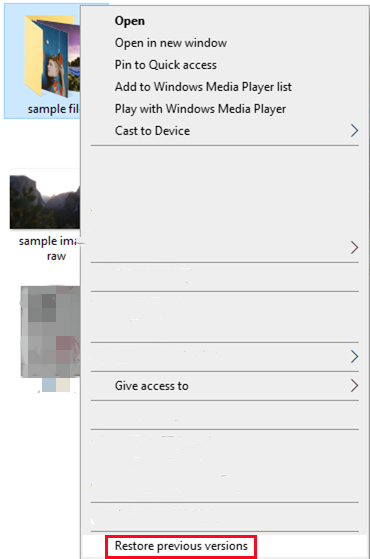
Step 2: A new pop-up window will show you all the versions of the folder that can be restored. So choose the appropriate version
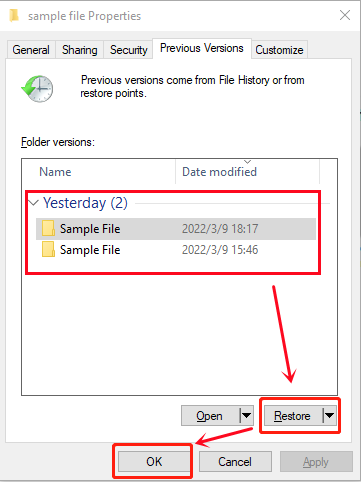
Step 3: Confirm the choice with the restore button and then select that you want to overwrite the files in the given folder

Step 4: Confirm your choices to complete the recovery
Warning:
It is better to have the feature activated that we talked about in the case of the second data recovery method.
What is good to mention
Let's quickly shed some light on important information that is good to know.
Why are photos permanently deleted?
Your photos may have been permanently deleted for several reasons. This happens for example:
- When using the keyboard shortcut Shift+Delete to delete images
- You delete the folder by mistake and then empty the trash
- Your snapshots are deleted unintentionally as a result of a hard drive failure or system crash
How not to lose photos permanently?
Now let's take a look at some tips that will help you avoid situations where you can permanently lose all your pictures:
- Do not use the Shift+Delete keyboard shortcut
Unlike using the Delete key, which will perform a normal deletion, this keyboard shortcut will take care of a complete deletion, including the trash.
- Use offline or online backup methods
Your photos will be safe if you back them up. You can make backups offline, using a USB flash drive or an external drive, or online, when you are offered solutions such as iCloud, OneDrive, Dropbox or Google Drive.
- Install data recovery software
Your lost or permanently deleted photos can be easily and instantly recovered with the help of professional data recovery software. In that case, you just need to click a few times and you're practically done. For this reason, we recommend you WorkinTool Data Recovery.
Summary
Recovering permanently deleted photos on Windows can actually be quite easy if you use the methods mentioned in this article. We therefore recommend testing the individual methods and finding your favorite that will suit you the most. We can definitely recommend WorkinTool Data Recovery.
So if you thought you lost your photos forever, don't worry. It has a solution!
Discussion of the article
Discussion is not open for this article.